


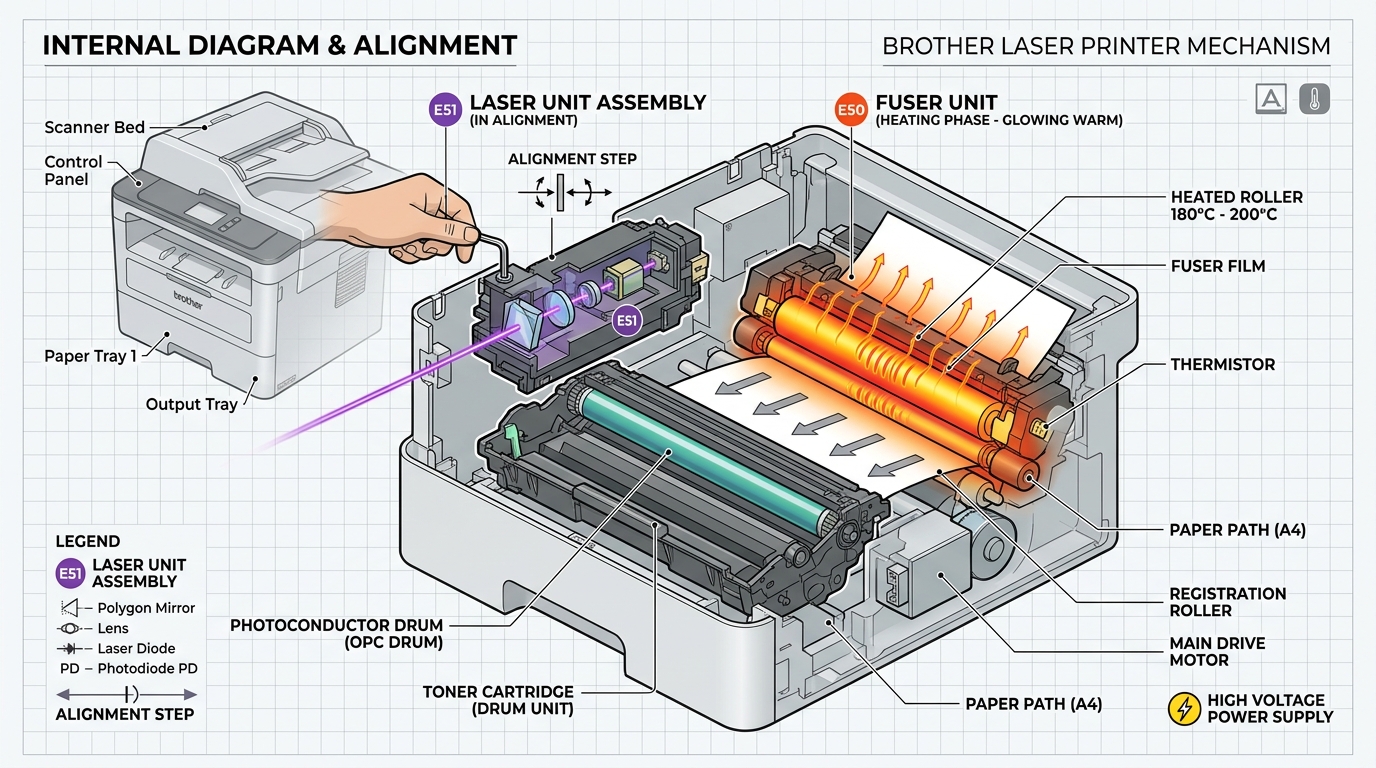
E50 and E51 look nearly identical on screen, one digit apart. And it's genuinely easy to assume they're minor variations of the same problem. They're not — they point at two different components entirely. And mixing them up means troubleshooting the wrong part of the machine.
The Core Difference
On most current Brother laser printers and multifunction units, E50 relates to the fuser unit — the component that heats. And bonds toner permanently onto paper — while E51 relates to the laser unit, the component responsible for drawing the image onto the drum before toner is even applied.
These are two entirely separate systems doing different jobs at different stages of the print process. And a fault in one doesn't imply anything about the other.
Why this matters: treating E51 as "basically the same as E50" and troubleshooting the fuser when the laser system is actually flagged (or the reverse) wastes time chasing the wrong component.
A Note on Model Variation
Brother's E-series codes aren't perfectly identical across every product generation and line — some older or business-class multifunction models use overlapping number ranges for genuinely different purposes than current consumer laser printers do. If your exact model's documentation or display gives a description alongside the code, trust that specific wording over a general guide, since it reflects what that particular machine's firmware (internal software) actually assigns to that number.
Why this matters: rather than assuming E50 and E51 mean the exact same thing on every Brother machine ever made, treat the fuser/laser distinction as the reliable general pattern for current consumer and small-office laser models. While double-checking your specific unit's own documentation if anything seems inconsistent with that.
What to Do for E50 (Fuser-Related)
Start with a full power cycle — off, unplugged for 60 seconds, then back on —. And connect the printer directly to a wall outlet rather than a surge protector or power strip, since fuser-related faults are sometimes tied to power delivery rather than genuine component failure.
Give the printer time to cool if it just finished a large job before retesting.
Why this works: these steps address the most common non-hardware causes of a fuser-related fault before you consider it a genuine part failure.
What to Do for E51 (Laser-Related)
Start by reopening the printer, removing and firmly reseating the toner and drum assembly. And confirming the cover latches fully closed on both sides. This error shows up disproportionately often right after a cartridge change, and reseating resolves the majority of those specific cases.
Why this works: the laser system's normal operation depends on the drum and toner assembly sitting in an exact position. And an improperly seated assembly or a cover that isn't fully latched can trigger this error without the laser component itself being faulty at all.
When to Call a Professional
If the appropriate fixes above for your specific code don't resolve it, both E50. And E51 can indicate genuine component failure requiring professional replacement — the fuser for E50, the laser unit for E51.
These are different parts with different costs, so knowing which one you're actually dealing with before calling for service or ordering a part saves you from the wrong purchase.
Deep-Dive Engineering Comparison: E50 (Fuser) vs. E51 (Laser Unit)
While their codes sound interchangeable, confusing E50 and E51 will lead you to replace the wrong expensive subassembly. Here is the technical breakdown of how each subsystem operates and fails:
| Attribute | Error E50 (Fuser Unit) | Error E51 (Laser / Polygon Motor) |
|---|---|---|
| Core Component | Halogen heater lamp / ceramic heating element & thermistor | Polygon mirror scanner motor & laser diode assembly |
| Physical Symptom | Printer rear feels cold, or distinct burning smell; toner rubs off printed paper | High-pitched whining noise that suddenly cuts out; blank white pages |
| Root Mechanism | Fuser failed to reach ~180°C within the warm-up timeout window | Polygon scanner mirror failed to lock onto target RPM (typically 20,000+ RPM) |
| Typical Fix | Replace fuser assembly or reset fuser error via maintenance mode | Clean laser glass window; replace laser scanner unit (LSU) |
Troubleshooting E50: Fuser Failure Recovery
- Turn off the machine and unplug for 15 minutes.
- Open the rear cover. Inspect the orange/brown heat roller. If the roller sleeve is torn, wrinkled, or locked, the fuser unit must be replaced.
- Check wall voltage: Laser fusers require 110-120V / 15A clean power. Powering a Brother laser printer through an undersized UPS battery backup or daisy-chained extension cord will starve the heating element and trigger false E50 codes.
Troubleshooting E51: Laser Scanner Recovery
- Listen to the machine during boot. When the engine starts, you should hear a rising acoustic whine as the polygon mirror spins up to speed. If you hear a stuttering chattering sound followed immediately by E51, the polygon motor bearings have seized.
- Open the top cover and remove the toner and drum unit. Look into the top cavity to locate the elongated laser scanner exit glass. Wipe this glass gently with a clean dry microfiber cloth to clear any toner dust blocking the beam detector sensor.
Why Brother Printer Shows E50 Right After Changing Toner
Opening the front cover to replace toner or the drum assembly is the single most common trigger for a sudden E50 fuser error.
While the fuser is located at the rear of the machine and the toner cartridge sits in the front cavity, three mechanical and electrical factors connect them during cartridge maintenance:
- Fuser Thermal Drop & Warm-Up Timeout: Opening the front cover trips a physical interlock switch that immediately cuts high-voltage power to the fuser heater lamp. If the cover remains open for more than a minute while you unpack and prepare the cartridge, the ceramic roller cools down completely. When you shut the door, the printer initiates an aggressive high-current warm-up cycle. If your wall outlet voltage is slightly low, the thermistor fails to reach 180°C within the 30-second timeout window, throwing error E50.
- Green Corona Wire Slider Left Unlocked: When installing a new toner cartridge into the drum unit, you must slide the green cleaning tab back and forth. You must return this tab to its home position (marked with a molded arrow on the left). If left in the center or right, high-voltage corona leakage overloads the power supply board, creating false E50 thermal fault signals.
- Drum Bias Ground Spring Misalignment: The drum assembly has metal grounding springs on its left and right chassis rails. If the cartridge was forced in unevenly, the grounding contact disconnects, producing unstable ground loops across the DC controller board.
How to resolve E50 after changing toner:
- Remove the drum and toner assembly: Pull the entire cartridge assembly out of the printer.
- Verify the corona wire tab: Ensure the green slide tab is snapped securely into its resting arrow notch on the far left side.
- Inspect the metal side contacts: Wipe the brass drum ground contacts on the left side of the cartridge and inside the printer cavity with a dry lint-free cloth.
- Firmly reinsert and latch: Slide the assembly straight in until both sides click, then firmly shut the front cover.
- Power cycle directly from the wall: Unplug the AC power cord for 60 seconds (bypassing any surge protector) and reconnect directly to a dedicated wall outlet.
Frequently Asked Questions
Why did Brother error E50 appear right after changing the toner?
Leaving the front door open allows the fuser to cool completely. Closing it demands peak warm-up current that can timeout on shared power strips. Also verify the green corona wire slider is fully clicked to its home arrow position.
Can a firmware (internal software) update fix E50 or E51?
Brother firmware (internal software) updates sometimes adjust the polygon motor startup acceleration curve to compensate for aging bearings. Which can clear intermittent E51 errors.
How much does it cost to replace a Brother fuser vs. laser unit?
A replacement Brother fuser assembly typically costs between $60 and $110 depending on the model. And is easily replaced via the rear panel.
