


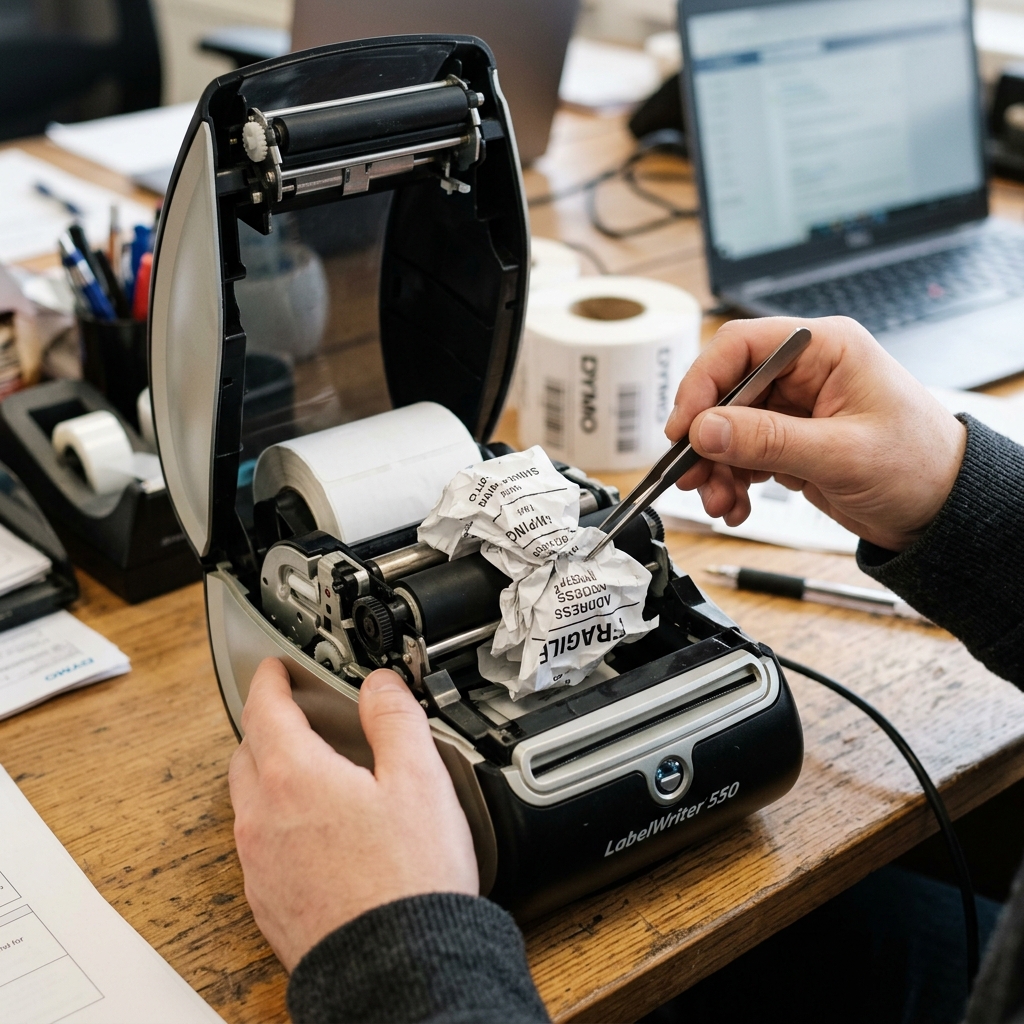
Introduction to Maintaining Your DYMO LabelWriter
The DYMO LabelWriter series, particularly the popular 450, 4XL,. The newer 5XL models, are essential workhorses for thousands of small businesses, shipping departments, and organized home offices.
These direct thermal printers are prized for their speed. Efficiency, and the complete elimination of messy ink cartridges and expensive toner replacements.
By utilizing heat to activate specialized chemicals on the surface of the label paper. They produce crisp, professional, and durable barcodes and text.
When functioning correctly, a DYMO LabelWriter operates smoothly in the background. Churning out hundreds of labels a day with minimal intervention required.
However, the direct thermal printing process is not entirely without its maintenance requirements. The very nature of the label media—paper backed with a layer of strong adhesive—creates a specific set of physical challenges.
Over time, and particularly during high-volume usage. When utilizing lower-quality third-party label stock, things can go wrong inside the machine.
The most common and frustrating mechanical failure is the dreaded label jam. Unlike a standard paper jam in a laser printer, a thermal label jam involves powerful adhesives.
If a label peels away from its backing paper while passing through the tight confines of the print mechanism. It can wrap itself tightly around the rubber platen roller.
Adhering stubbornly to the internal components and bringing operations to an immediate halt.
In this comprehensive maintenance guide, we will tackle the intricate process of resolving severe label jams. Performing preventative maintenance on DYMO LabelWriter printers.
We will explore the mechanical reasons behind why these jams occur. Provide a meticulous, step-by-step procedure for safely extracting jammed labels without damaging delicate internal components.
And outline essential cleaning protocols for the optical sensors and the thermal print head. By adhering to these practices, you can significantly extend the lifespan of your printer and maintain optimal print quality.
Why This Happens: The Anatomy of a Label Jam
Understanding why label jams occur is the first step in preventing them. The internal path of a DYMO printer is remarkably compact.
Labels are pulled from the roll, passed over an optical sensor that detects the gaps between labels. And then squeezed tightly between a heated ceramic print head and a rubberized platen roller.
The friction of the rubber roller pulls the paper through. The print head applies the necessary heat to create the image.
Jams primarily occur when this delicate mechanical balance is disrupted. A common culprit is excessive heat or humidity in the operating environment.
Which can soften the adhesive on the labels, causing them to separate from the slick backing paper prematurely. When an unbacked label enters the roller assembly, the sticky side adheres instantly to the rubber platen roller.
As the roller turns, it wraps the label around itself multiple times. Creating a thick, sticky mass that completely blocks the paper path and strains the drive motor.
Another frequent cause is the accumulation of paper lint and adhesive residue. As thousands of labels pass through the machine, microscopic particles of paper and glue are left behind.
If this residue builds up on the rubber roller. It loses its grip, causing the labels to slip, misalign, and eventually bunch up into a jam.
Furthermore, the optical sensor—a tiny LED and receptor located just before the roller—is highly susceptible to this same residue. If paper dust or a stray piece of adhesive covers the sensor, it becomes "blind." The printer can no longer detect the index marks.
Gaps between the labels, causing it to continuously feed paper in a desperate attempt to find a starting point. This erratic feeding behavior often leads directly to a massive accordion-style jam within the chassis.
Requiring immediate intervention to prevent permanent hardware damage.
Step-by-Step Fix: Safe Jam Removal and Cleaning
Attempting to forcefully rip a jammed label out of a DYMO printer is the. Quickest way to destroy the thermal print head or strip the internal gears. Patience and precision are required. Follow these steps meticulously to clear the jam and clean the printer.
- Power Down and Disconnect: Safety first. Turn off the printer and completely disconnect both the power cable and the USB cable. You will be working near delicate electronic components, and the printer must be entirely unpowered.
- Open the Chassis: Open the top cover and remove the label spool containing the remaining roll of labels. This provides clear visual access to the feed mechanism and the jam itself.
- Release the Print Head Tension: Locate the release lever situated on the side of the label compartment (usually on the left side, near the roller). Flip this lever forward or upward (depending on the model) to lift. The thermal print head away from the rubber platen roller. This relieves the pressure and is the most crucial step in safely removing a jam.
- Extract Loose Material:With a pair of precision tweezers, gently grasp any loose bits of backing paper. Un-adhered label material and carefully pull them out of the paper path. Do not pull hard if resistance is felt.
- Address the Wrapped Roller:If a label is tightly wound around the rubber platen roller. DO NOT use a knife, scissors, or any sharp metal object to cut it. Doing so will permanently score the soft rubber roller, rendering the printer unusable. Instead, use a cotton swab heavily saturated with rubbing alcohol (isopropyl alcohol, 90% or higher). Generously apply the alcohol directly to the jammed label. The alcohol will break down the chemical bonds of the adhesive. Wait several minutes for the alcohol to penetrate.
- Unwind the Label:Once the adhesive is softened, use the tweezers. Your fingernails to carefully find the edge of the label and slowly unroll it from the roller. If it remains stubborn, apply more alcohol and wait again. Patience is key.
- Clean the Platen Roller:After the jam is clear, use a fresh alcohol-soaked cotton swab. To scrub the entire surface of the rubber platen roller. Manually rotate the roller to clean it completely. Remove all traces of leftover adhesive and paper dust until the roller feels clean and slightly tacky to the touch.
- Clean the Optical Sensor: Locate the small slot just below or before the roller assembly where the optical sensor resides. Use a clean, dry cotton swab. A can of compressed air to gently remove any dust or debris from this area. Do not use liquid cleaners directly in the sensor slot.
- Clean the Thermal Print Head:Finally, use an alcohol wipe or an alcohol-dampened lint-free cloth to gently. Wipe the thin black line of the thermal print head. Wipe horizontally from side to side to remove any carbon buildup or adhesive residue.
- Reassemble and Test: Allow all components to dry completely (alcohol evaporates quickly). Re-engage the print head release lever. Reload the label spool, reconnect the cables, and perform a test print to verify functionality.
Advanced Troubleshooting: Persistent Feeding Issues and Sensor Failures
If you have meticulously cleaned the roller and sensor but the printer continues to feed labels erratically. Skips blank labels, or flashes an error light immediately upon feeding.
You may be dealing with a more persistent hardware issue. First, verify the quality of your label media.
Extremely cheap, generic labels often have inconsistent index holes or gaps that the optical sensor struggles to read. Try switching to a roll of genuine DYMO labels to see if the issue resolves; if it does.
The problem lies with the media, not the machine.
If genuine labels also fail, the optical sensor itself may require a deeper cleaning or recalibration. For recalibration, with the power connected but the USB disconnected, hold down the feed button on.
The front of the printer while simultaneously unplugging the power cable from the back. Continue holding the feed button, plug the power back in.
And keep holding the button until the printer begins to cycle. This forces a factory hardware reset and sensor recalibration.
If all cleaning and reset procedures fail, and the printer remains stubbornly unresponsive to paper feeding. The optical sensor hardware itself may have failed, requiring professional repair or replacement of the printer unit.
FAQ
Can I use WD-40 or Goo Gone to remove adhesive from the roller?
Absolutely not. You should never use oil-based solvents like WD-40 or aggressive chemical adhesive removers like Goo Gone inside a thermal printer.
Why did my labels turn completely black during a jam?
Thermal labels are designed to turn black when exposed to heat. During a severe jam, if the print head is not released.
How often should I clean the print head and roller?
For preventative maintenance, it is highly recommended to clean the print head. The platen roller every time you change the label roll.
I accidentally scratched the rubber roller while removing a jam. Can it be fixed?
Unfortunately, a scratched or gouged platen roller cannot be repaired. The surface must be perfectly smooth and cylindrical to pull labels evenly and provide consistent pressure against the print head.
What is the purpose of the small lever next to the label roll?
The small lever located near the label roll or platen assembly is the print head release lever. Its sole purpose is to lift the heated ceramic print head away from the rubber roller.
Furthermore, maintaining a consistent environment can significantly reduce these issues. Avoid placing your printer in direct sunlight, near strong heat sources, or in areas with excessive dust and debris.
Ensuring proper ventilation around the printer helps keep internal components cool during long print runs, preventing overheating and potential damage. Regularly inspecting the power cables and USB connections for any signs of wear.
Tear can also prevent unexpected connectivity drops or power failures during critical operations.
In addition to hardware maintenance, always keep your software drivers and firmware (internal software) (internal software) up to date. Manufacturers frequently release updates that address known bugs, improve compatibility with the latest operating systems, and enhance overall performance.
Subscribe to newsletters or check the manufacturer's support website periodically for any crucial updates related to your specific model. Implementing these best practices will not only resolve immediate errors.
Also provide a stable, long-term printing solution for your business needs.
When dealing with technical support, always have your exact model number. Serial number, and a detailed description of the error code or issue ready.
This information allows support technicians to quickly identify potential causes and provide accurate solutions. Keeping a log of when errors occur, any changes made to the system prior to the issue.
And the exact steps taken during troubleshooting can also be immensely helpful in diagnosing complex. Intermittent problems that may require advanced intervention.
