


Introduction
Lexmark printers are renowned for their robust build quality and suitability for high-volume enterprise printing environments. However, even the most reliable machines can encounter mechanical issues over time, especially in components subjected to constant physical stress.
One of the most notorious and disruptive issues is the Error943. Which typically points to a failure in the tray lifting mechanism or the duplex assembly.
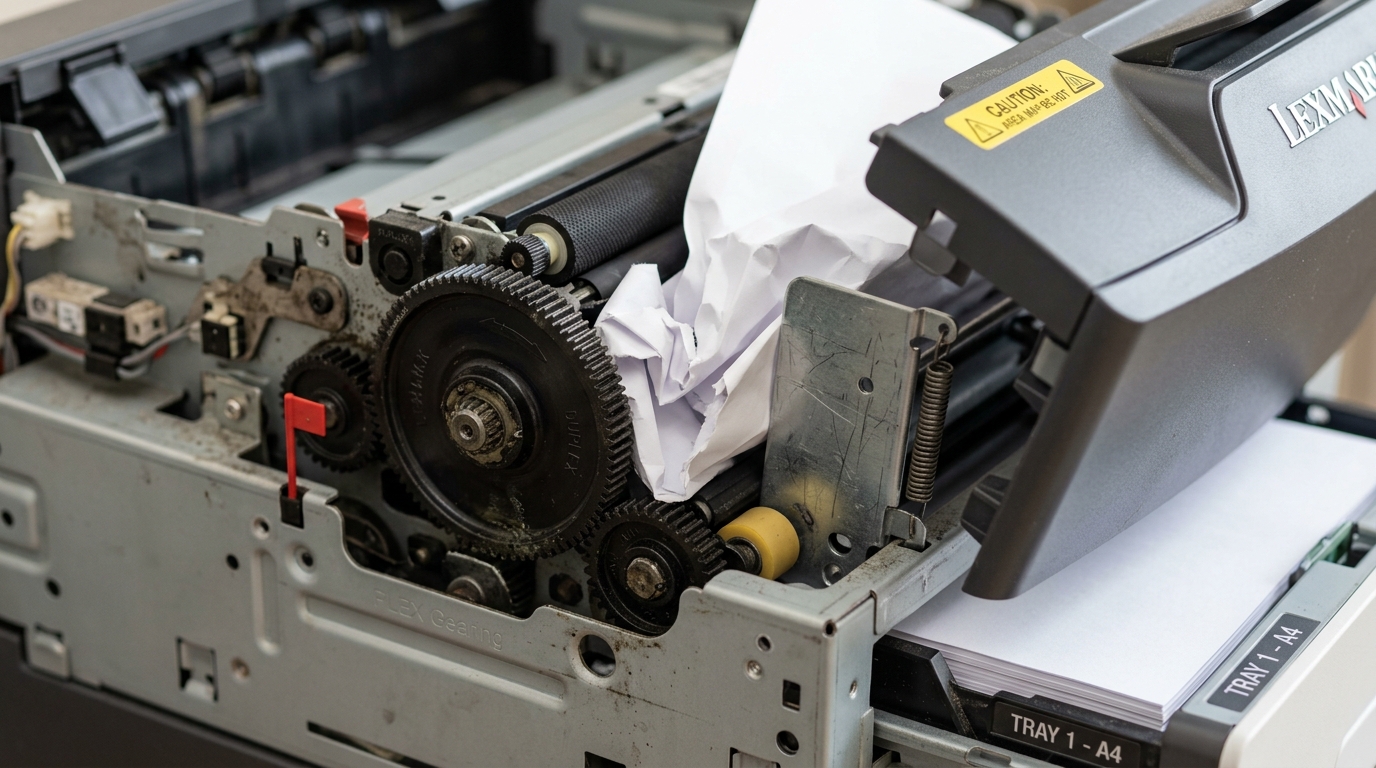
When your Lexmark printer displays an Error 943, it usually means that the paper tray gears haveslipped. Stripped, or encountered excessive resistance, causing a failure in lifting the paper to the feed rollers.
This often coincides with persistent duplex jams, where paper gets stuck while reversing for two-sided printing. Understanding the root cause of this mechanical failure is critical for implementing a long-lasting fix rather than a temporary band-aid.
In this comprehensive guide, we will explore the intricate workings of the Lexmark paper feed and duplexingmechanisms. Identify the common culprits behind Error 943, and provide a detailed, step-by-step repair process to get your printer back to optimal performance.
Why This Happens
To fully grasp why Error 943 and duplex jamsoccur. It is essential to understand the mechanical design of the Lexmark tray and feed systems.
The paper tray is not simply a passive receptacle; it contains an active lifting plate driven by a series of reduction gears connected to a main drive motor. When the tray is inserted, a sensor detects its presence,.
The motor engages to lift the stack of paper until the top sheet makes contact with the pick roller. The resistance of the paper stack is monitored to ensure the correct lifting height.
Over time, several factors can compromise this system. Firstly, the introduction of paper dust and environmental debris can accumulate in the gear teeth.
This debris hardens over time, increasing the friction between the gears. As friction increases, the motor has to work harder, placing immense stress on the plastic gear teeth.
This prolonged stress leads to micro-fractures and eventually, stripped gears. When a gear slips, the tray fails to lift evenly or atall.
Triggering the Error 943 code as the printer times out waiting for the paper to reach the pick position.
Secondly, the duplex unit, which relies on a complex series of reversing rollers. Diverter gates, is highly sensitive to timing and paper path obstructions.
If the tray gears are slipping, the initial paper feed is delayed. This delay throws off the precise timing required for the duplex unit to successfully capture and reverse the page.
Furthermore, worn separation rollers or a failing torque limiter can cause multiple sheets to feedsimultaneously. Creating massive jams within the tight confines of the duplex assembly.
The combination of compromised tray gears and worn duplex components creates a perfect storm for recurring Error 943. Severe paper jams that require immediate intervention.
Another often overlooked cause is the improper loading of paper or the use of non-standard media. Forcing too much paper into the tray beyond the maximum fill line exerts excessive downward pressure on the liftplate.
Overloading the gear train when it attempts to lift. Similarly, damp or curled paper increases the friction within the paperpath.
Requiring more torque from the drive motors and accelerating the wear and tear on the plastic gears.
Step-by-Step Fix
- Power Down and Isolate the Printer: Begin by turning off the Lexmark printer using the main power switch. Unplug the power cord from the wall outlet to ensure absolute safety while working on the internal mechanical components. Allow the printer to cool down for at least 15minutes. As the fuser unit can remain extremely hot and cause severe burns.
- Remove and Inspect the Paper Trays: Slide out all paper trays completely. Empty the paper and inspect the lift plate within the tray. Press down on the lift plate; it should move smoothly and spring back without binding. Inspect the gear interface on the side of the tray that connects to the printer's internal drive. Look for any broken teeth or excessive wear.
- Access the Internal Gear Assembly:Depending on your specific Lexmark model, you may need to remove the right-side cover. The rear access panel to reach the main drive assembly. Use a Phillips-head screwdriver to remove the retaining screws. Carefully unclip the plastic retaining tabs and set the panel aside.
- Clean the Gear Train: Using a can of compressed air, meticulously blow out all paper dust and debris from the gear train. For stubborn, hardened debris, use a soft-bristled brush or a cotton swab lightly dampened with isopropyl alcohol (99% concentration). Never use oil-based lubricants, as they will attract more dust and worsen the problem.
- Identify and Replace Stripped Gears: Closely examine each gear in the tray lift mechanism and the duplex drive train. Rotate the gears manually to check for smooth operation. If you identify any gears with rounded, missing, or stripped teeth, they must be replaced. Consult your printer's service manual for the exact part numbers of the required gear kits.
- Service the Duplex Assembly: Open the duplex door and inspect the reversing rollers. Wipe them down with a lint-free cloth moistened with water or a specialized rubber roller cleaner. Ensure the diverter gates move freely and are not blocked by tiny torn pieces of paper from previous jams.
- Reassemble and Test: Once the new gears are installed and the assemblies are clean, carefully replace the covers and secure the screws. Reinstall the paper trays with a fresh, properly fanned stack of high-quality paper. Plug the printer back in and power it on. Print a settings page, followed by a multi-page duplex test job to verify the resolution of Error 943. The elimination of duplex jams.
- Perform a Factory Calibration: In some cases, the printer may need to recalibrate its tray lift sensors after the mechanical repairs. Navigate to the printer's diagnostic menu (usually accessed by holding down specific button combinations during boot-up). Run the tray lift calibration routine to ensure optimal timing and operation.
Advanced Troubleshooting
If you have replaced the visibly damaged gears and thoroughly cleaned theassemblies. But the Error 943 persists, you must explore more advanced diagnostic procedures. The issue may reside not in the mechanical gears themselves, but in the electromechanical components that drive and monitor them.
First, evaluate the tray lift motor. A failing stepper motor may not generate sufficient torque to lift a full tray ofpaper.
Even if the gear train is pristine. You can test the motor's resistance using a digital multimeter.
Compare the resistance readings across the motor's coil pins against the specifications provided in the Lexmark service manual. A significant deviation indicates a shorted or open coil, necessitating a motor replacement.
Next, inspect the optical sensors associated with the tray lift and duplex paper path. These sensors use an infrared LED and a phototransistor to detect the presence and position of the paper.
Over time, paper dust can coat the sensor lenses, blinding them. Causing the printer to falsely report jams or mechanical failures.
Use a can of compressed air. A dry cotton swab to meticulously clean every optical sensor in the affected paper path.
Additionally, check the flag actuators that interrupt the optical beam; ensure they are not warped, sticking, or broken.
Finally, consider the possibility of a main logic board (engine board) failure. If the board fails to send the correct voltage to the lift motor.
Incorrectly interprets the sensor data, it will erroneously trigger an Error 943. This is the most complex and expensive component to replace.
Should be considered the last resort after all mechanical and sensor-related variables have been eliminated.
FAQ
Can I use WD-40 to lubricate the printer gears?
Absolutely not. WD-40 and other petroleum-based lubricants will degrade the plastic gears over time and act as a magnet for paper dust.
Does Error 943 always mean I need to replace gears?
Not always. While stripped gears are the most common cause, Error 943 can also be triggered by severe paper jams that are obstructing the liftmechanism.
Why does the printer jam only when doing double-sided printing?
Duplex printing requires the paper to travel through a much more complex path, involving reversing rollers and diverter gates. If the tray gears are slightly worn, the initial feed timing might be slightly delayed.
How can I prevent Error 943 from occurring in the future?
Preventative maintenance is key. Regularly clean the paper path and gear assemblies with compressed air to remove paper dust.
