


Fix Lexmark Cartridge Chip Errors (1200, 1203, 1204, 120F)
Lexmark laser printers are widely utilized in enterprise environments and home offices alike, favored for their rapid print speeds, sharp text rendering, and robust networking capabilities. However, users often encounter frustrating roadblocks in the form of cartridge chip errors.
The most notorious of these are the 1200, 1203, 1204, and 120F series errors. These numerical codes, often accompanied by messages like "Unsupported Cartridge," "Non-Lexmark Cartridge," or "Replace Cartridge," completely halt printing operations, turning a productive workstation into a standstill.
These errors do not necessarily indicate a mechanical failure within the printer itself, but rather a communication breakdown between the printer's logic board and the microchip embedded on the toner cartridge. Understanding why these errors occur and how the chip verification process works is essential for troubleshooting and resolving them.
This comprehensive guide will dissect the meaning of Lexmark errors 1200, 1203, 1204, and 120F, explain the underlying digital rights management (DRM) strategies employed by manufacturers, and provide a detailed, step-by-step approach to clearing these errors and getting your printer back online.
Why This Happens: The Role of the Cartridge Chip
To comprehend these specific error codes, it's vital to understand the function of the cartridge chip. Modern toner cartridges are not merely plastic reservoirs holding toner powder; they are smart devices equipped with integrated circuits.
These microchips serve several critical functions. Firstly, they track toner usage, allowing the printer to estimate remaining page yield and provide low toner warnings.
Secondly, they contain region encoding, ensuring that a cartridge purchased in Europe (for example) cannot be used in a printer sold in North America. Lastly, and most pertinently to these errors, the chips serve as a form of authentication and Digital Rights Management (DRM).
When you insert a cartridge into a Lexmark printer, the printer reads the data on the chip. It verifies the cartridge's model number, region code, and authenticity. The errors 1200, 1203, 1204, and 120F are triggered when this verification process fails.
Error 1200 & 1203 (Unsupported or Non-Lexmark Cartridge): These errors typically occur when you attempt to use third-party, compatible, or remanufactured cartridges. Lexmark (like many manufacturers) employs firmware updates to actively identify and reject non-original chips.
If the third-party chip's programming does not perfectly mimic an original OEM chip, or if Lexmark has released a firmware update that blacklists that specific third-party chip design, the printer will reject it and display a 1200 or 1203 error.
Error 1204 (Unsupported Cartridge/Region Issue): The 1204 error often points specifically to a region coding mismatch. If you bought your printer in one geographic zone but purchased a cartridge intended for a different zone, the chips will conflict, triggering this error, even if the cartridge is genuine Lexmark.
Error 120F (Cartridge Communication Error): While the previous errors are often related to DRM rejection, the 120F error frequently points to a physical or electrical communication failure. This happens when the printer cannot read the chip at all.
This can be caused by dirt or toner dust obstructing the gold contacts on the chip, physical damage to the chip itself, or bent contact pins inside the printer's cartridge bay.
Step-by-Step Fix: Resolving Chip Communication Failures
Troubleshooting these errors requires addressing both physical connection issues and potential firmware conflicts. Follow these steps systematically.
- Power Cycle the Printer: The simplest step is often the most effective for clearing transient glitches. Turn the Lexmark printer off using the power button. Unplug the power cord from the wall outlet and wait for at least 60 seconds. This allows the printer's internal memory to clear. Plug the printer back in and power it on. Wait for it to initialize and see if the error clears.
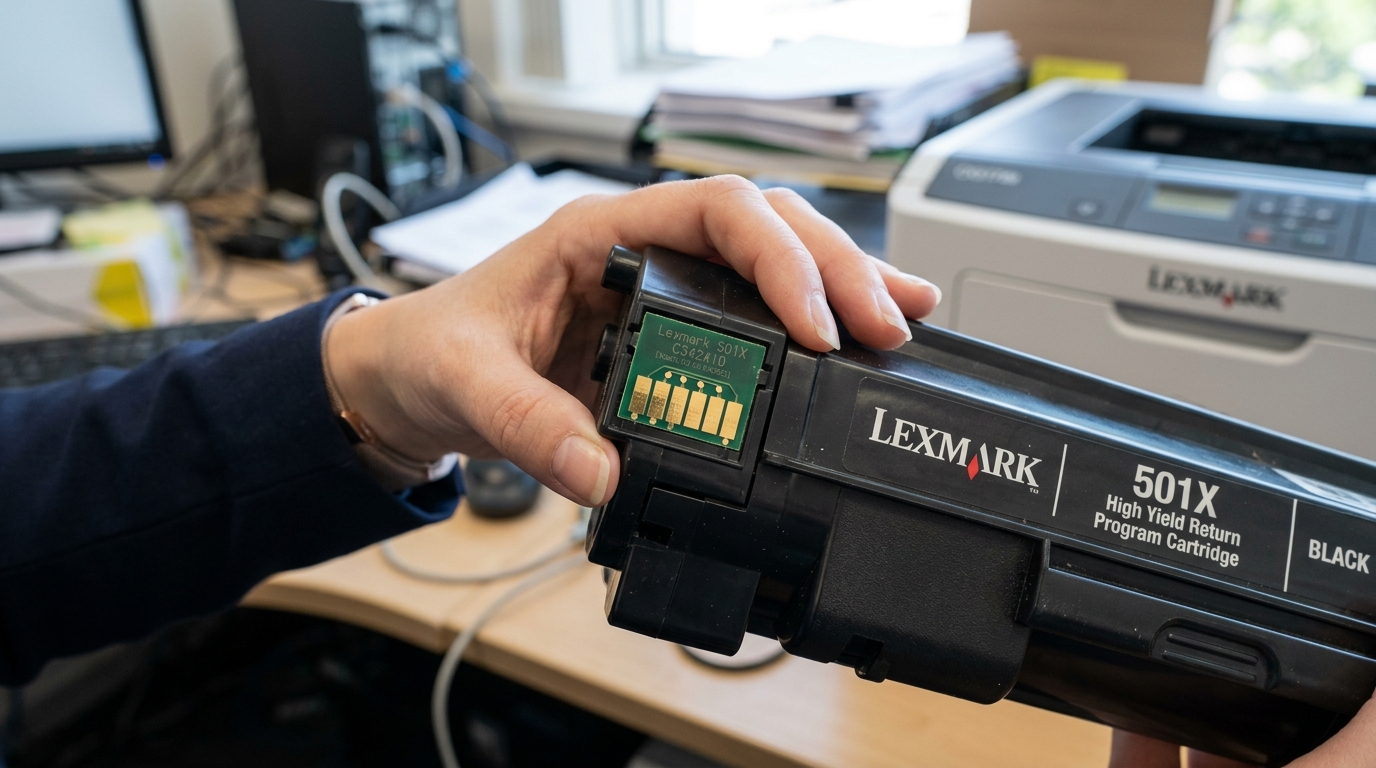
- Remove and Inspect the Cartridge: Open the front cover and carefully remove the toner cartridge (and the imaging drum unit, if they are separate). Inspect the small microchip located on the cartridge. It usually looks like a small green board with gold contact pads.
- Clean the Chip Contacts: This is a critical step for Error 120F. Toner dust or finger oils can easily obscure the electrical contacts. Take a clean, dry, lint-free cloth (a microfiber cloth is ideal) and gently wipe the gold contacts on the cartridge chip. Do not use water or solvents. Ensure the contacts are bright and free of residue.
- Inspect the Printer Contacts: Shine a flashlight into the printer cavity where the cartridge seats. Locate the small wire pins or spring contacts that press against the cartridge chip. Check for any bent, broken, or misaligned pins. If a pin is damaged, the printer cannot communicate with the chip, and professional repair may be necessary. Also, ensure no loose toner has accumulated over these contacts; if so, gently blow it out with compressed air.
- Reinstall Firmly: Slide the cartridge back into the printer. Ensure it clicks firmly and securely into place. Sometimes a cartridge that is slightly askew will fail to make proper contact with the chip reader. Close the printer cover and wait for initialization.
- Verify Region Compatibility (Error 1204): If you are receiving a 1204 error, double-check the packaging of your cartridge. Look for a region code indicator (e.g., NA for North America, EMEA for Europe/Middle East/Africa). Ensure this matches the region where the printer was originally purchased. If there is a mismatch, the cartridge will not work, and you must obtain the correct regional version.
- Address Firmware and Third-Party Chips (Errors 1200/1203): If you are using non-OEM compatible cartridges and receive these errors, the issue is likely firmware-related. Lexmark often pushes automatic firmware updates over the internet that disable older third-party chips. Your immediate solution is to contact the vendor who sold you the compatible cartridge; reputable vendors will often replace the cartridge with one containing an updated chip that bypasses the new firmware.
Advanced Troubleshooting: Firmware Downgrades and Resets
If you have cleaned the contacts and verified the cartridge but the errors persist, particularly with third-party cartridges, the printer's firmware is the likely culprit blocking the chip.
The most drastic, but often necessary, step for users relying on compatible cartridges is to disable automatic firmware updates. While firmware updates can provide security patches, their primary function in modern printers is often to update the database of rejected third-party chips.
Navigating through your printer's control panel menus (usually under Settings > Device > Update Firmware or similar network settings), you should look for an option to disable "Auto Update" or "Allow Updates."
In some cases, if an update has already occurred and locked out your cartridges, you may need to investigate firmware downgrading. This is an advanced and potentially risky process that involves manually loading an older version of the printer's operating software.
It requires finding the older firmware file online and following specific manufacturer instructions, which are often not publicly supported. Proceed with caution, as interrupting a firmware flash can permanently damage (brick) the printer.
If you are using a guaranteed Genuine Original Lexmark cartridge and still receive a 1200 or 1203 error after cleaning the contacts, the chip itself may be defective from the factory. In this scenario, your best recourse is to contact Lexmark support or the retailer for a warranty replacement, as there is no user-serviceable fix for a physically dead OEM chip.
FAQ
Can I just bypass the chip error and print anyway?
Generally, no. Lexmark (and most manufacturers) design these errors to be hard stops.
Why did my compatible cartridge work yesterday but give an error today?
This is almost certainly due to a silent, automatic firmware update that occurred overnight. The printer downloaded a new list of restricted chip codes, and your previously working compatible cartridge was added to the blacklist.
Is it legal for Lexmark to block third-party cartridges?
The legality is a complex issue involving patent law and consumer protection, varying by region. However, manufacturers use firmware updates to protect their intellectual property (the chip design) and ensure print quality, which effectively serves to block non-OEM supplies.
How can I clean the printer contacts safely?
Be very gentle. Ensure the printer is unplugged.
What if I get a 120F error with a brand new, genuine Lexmark cartridge?
If you have cleaned the chip and printer contacts and the error persists with a brand new OEM cartridge, it is highly likely the cartridge has a defective chip, or the contact pins inside the printer are damaged. Contact Lexmark support for assistance.
