


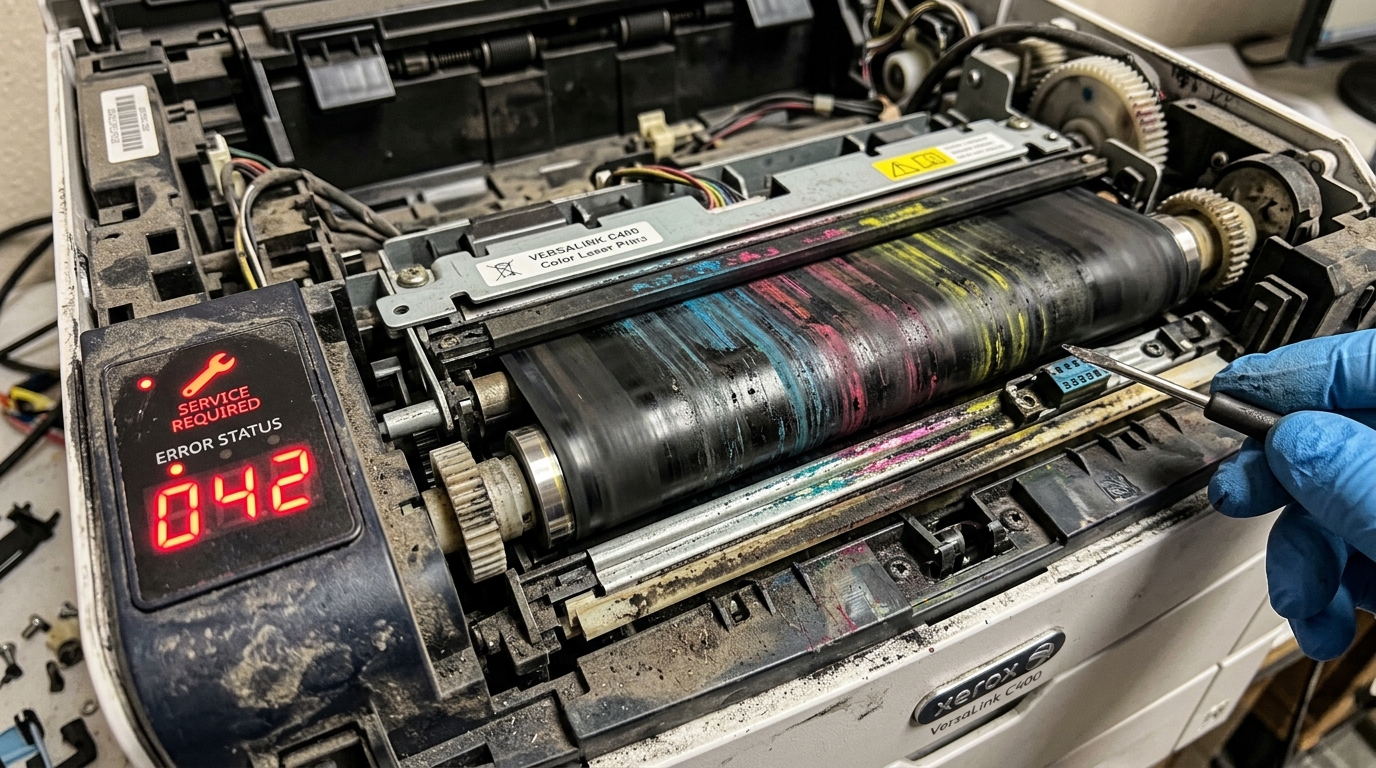
Comprehensive Guide: Fixing Xerox 041, 042, and 053 Error Codes (Fuser and Transfer Belt Issues)
Xerox multifunction printers and enterprise presses are renowned for their robust engineering and exceptional print quality. However, when you encounter error codes starting with 041, 042, or 053, your production can grind to an immediate halt.
These specific faults are categorized as critical subsystem failures, relating directly to the Fuser Module. The Image Transfer Belt (ITB) assemblies.
Understanding the electromechanical triggers behind these codes is essential for IT administrators, print shop operators,. Technicians to minimize downtime and avoid unnecessary, expensive part replacements.
The xerographic process relies on absolute synchronization between various high-voltage and high-temperature components. The transfer belt is responsible for accumulating the cyan, magenta, yellow,.
Black toner images in perfect registration before transferring the composite image onto the paper. The fuser then applies immense heat and pressure to permanently melt the toner into the paper fibers.
Errors in the 041, 042,. 053 ranges indicate that the printer's diagnostic sensors have detected a failure in temperature regulation, mechanical movement, or electrical continuity within these critical subsystems.
Ignoring these warnings or attempting to bypass them can result in catastrophic damage to the machine or even pose a fire hazard.
This guide delves deep into the root causes of these errors, explaining the physics of the failures. Providing a structured, step-by-step resolution process.
We will cover how to safely reset soft codes, physically inspect the fuser. Transfer belt for damage, and perform advanced diagnostics using Xerox's internal service modes (NVM read/write procedures) to clear hard faults that persist even after replacing the affected parts.
Why This Happens: Decoding the Errors
To effectively troubleshoot, we must break down what each error code family represents. Xerox error codes are highly specific, and the service manual provides exact component level pinpointing.
041-xxx Errors (Fuser Temperature/Control Faults): The fuser contains heating elements (halogen lamps or ceramic heaters), thermistors (temperature sensors), and thermostats (hard safety cut-offs). A 041 error typically means the fuser has failed to reach standby temperature within a specified time.
Has exceeded the maximum safe operating temperature (over-temperature), or the logic board has lost communication with the thermistors. Dust accumulation on the thermistors can insulate them.
Causing the printer to continuously supply power to the heater until it triggers a thermal runaway fault. Alternatively, a sudden power surge can blow the main fuser triac on the power supply board.
Preventing any voltage from reaching the lamps.
042-xxx Errors (Transfer Belt Motor/Sync Faults):The Image Transfer Belt (ITB) must rotate at an exact speed, synchronized with the laser scanning unit. The drum cartridges.
An 042 error indicates a mechanical or electrical failure related to the ITB drive system. This is frequently caused by a snapped ITB drive belt (internal to the motor assembly), a seized bearing on one of the ITB tension rollers, or a failure of the optical sensor that reads the reflective patch on the edge of the transfer belt to monitor speed.
Registration. If the belt binds due to excessive waste toner buildup in the cleaning assembly, the motor will draw too much current,.
The main controller will throw an 042 code to prevent burning out the motor driver.
053-xxx Errors (General Sensor/Interlock Faults): While less specific to the fuser and ITB than 041/042, 053 errors often accompany them. These codes generally relate to environmental sensors, interlock switches, or high-voltage bias faults.
For example, if the fuser door interlock switch is damaged or not fully engaging, the printer will cut high voltage to the transfer belt. Power to the fuser for safety, resulting in a cascade of errors.
Similarly, a failure in the high-voltage power supply (HVPS) providing the transfer current to the ITB can register as an 053 fault.
A critical point to remember is the difference between "soft" and "hard" faults. A soft fault is a temporary glitch that can be cleared by rebooting.
A hard fault (like a blown fuser thermostat) is logged in the machine's Non-Volatile Memory (NVM). Even if you replace the broken fuser, the printer will continue to display the error until the specific NVM value is manually reset in Service Mode.
This is a deliberate safety feature by Xerox.
Step-by-Step Fix: Diagnostics and Resolution
- Safe Shutdown and Power Cycle (Soft Reset): The first step is to attempt a full power cycle to clear temporary logic errors. Turn off the printer using the main power switch on the control panel. Wait for the screen to go completely dark. Then, open the front door. Locate the hard power switch (usually near the power cord receptacle) and turn it off. Unplug the machine from the wall for 5 minutes. Plug it back in, turn on the hard switch, then the soft switch. If the error clears, it was likely a momentary voltage fluctuation.
- Physical Inspection of the Fuser Module:If a 041 error persists, power down the machine completely. Wait at least 30 minutes for the fuser to cool. Open the designated access door (usually the right side door). Carefully release the locking levers and slide the fuser out. Inspect the heating rollers (the orange or brown rollers) for deep gouges, melted toner buildup, or delamination. Check the electrical connector on the rear of the fuser for bent or burnt pins. If physical damage is evident, the fuser must be replaced.
- Physical Inspection of the Transfer Belt (ITB): For 042 errors, remove the ITB unit. This usually involves removing the waste toner container and drum cartridges first. Slide the ITB out on its rails. Inspect the surface of the belt for scratches, tears, or excessive toner dumping. Manually turn the drive gear on the side of the ITB assembly; it should rotate with smooth, even resistance. If it is locked solid, the cleaning blade is likely jammed with waste toner. Or a bearing has failed, necessitating replacement of the ITB module.
- Clean Optical Sensors:While the ITB is removed, locate the small optical sensors inside the printer cavity that sit below the edge of the transfer belt (registration. Density sensors). Use a lint-free swab (and a drop of distilled water if necessary) to gently clean the lenses. A dusty sensor will cause 042 sync errors.
- Resetting the NVM (Service Mode): If you have replaced the fuser or ITB and the error persists, you must clear the hard fault in NVM. This requires entering Xerox Diagnostic/Service Mode. The sequence varies by model (e. g. , holding '0' for 5 seconds and pressing 'Start', then entering the passcode, usually '6789'). Once in service mode, navigate to the NVM Read/Write section. You must look up the specific NVM chain-link code for your printer model's fuser error (e. g. , Chain 744, Link 220) and change the value from '1' (error active) to '0' (cleared). Save the changes and exit service mode.Warning: Changing random NVM values can brick your printer. Only change the specific code documented for your exact model.
- Verify Interlock Switches: If an 053 error accompanies the fuser/ITB codes, inspect the plastic tabs on all access doors. Ensure they are not broken and are fully actuating the micro-switches inside the machine when closed. A bypassed or broken door switch will prevent the high voltage systems from engaging.
Advanced Troubleshooting: Beyond Part Replacement
When replacing the fuser or ITB. Resetting the NVM fails to resolve the 041/042/053 errors, the problem lies deeper within the printer's electrical infrastructure. This requires an advanced technician with a multimeter and access to the machine's electrical schematics.
For persistent 041 fuser errors, the Power Supply Board (LVPS/Main Power) is the next logical suspect. The triac that switches AC voltage to the fuser lamps may be shorted open or closed.
You can test the continuity of the fuser circuit from the connector on the printer chassis back to the power supply. Additionally, test the resistance of the fuser thermistors (if you have the specifications); an open circuit (infinite resistance) indicates a blown thermistor or thermal fuse within the fuser itself,.
If the fuser is new, the wiring harness connecting it to the MCU (Main Control Unit) board may be pinched or damaged.
For intractable 042 ITB errors, suspect the Main Drive Motor Assembly. The ITB is often driven by a large BLDC (Brushless DC) motor.
If the motor driver IC on the MCU board fails, it will not send the correct phase pulses to the motor, resulting in a stall condition. An 042 code.
Using an oscilloscope to probe the motor drive signals can confirm MCU failure. Furthermore, check the 24V DC rail from the power supply; a voltage drop under load can cause the motors to lose torque.
Desynchronize, triggering the error.
In extremely rare cases, the firmware (internal software) itself becomes corrupted, causing erroneous sensor readings and triggering false hardware faults. Reflashing the machine's firmware (internal software) via a USB drive (known as an AltBoot procedure) can sometimes cure bizarre. Unresolvable error codes that defy logical hardware troubleshooting.
FAQ
Can I just bypass the fuser error and continue printing?
No. Fuser errors (like 041) are critical safety mechanisms.
How long should a Xerox fuser or Transfer Belt last?
The lifespan is rated in pages (yield) and varies vastly by model. Desktop printers might need a new fuser every 50,000 pages, while enterprise presses might go 300,000+ pages.
I replaced the fuser, but the error came back immediately. Why?
This is almost certainly a "hard fault" logged in the NVM (Non-Volatile Memory). Xerox printers latch these errors to prevent damage in case the user just turns the machine off.
Are refurbished fusers or ITBs reliable for fixing these codes?
Refurbished parts can be a cost-effective solution, provided they are rebuilt by a reputable vendor. Ensure the vendor replaces the thermistors and thermal fuses in a fuser, and the cleaning blade in an ITB.
