


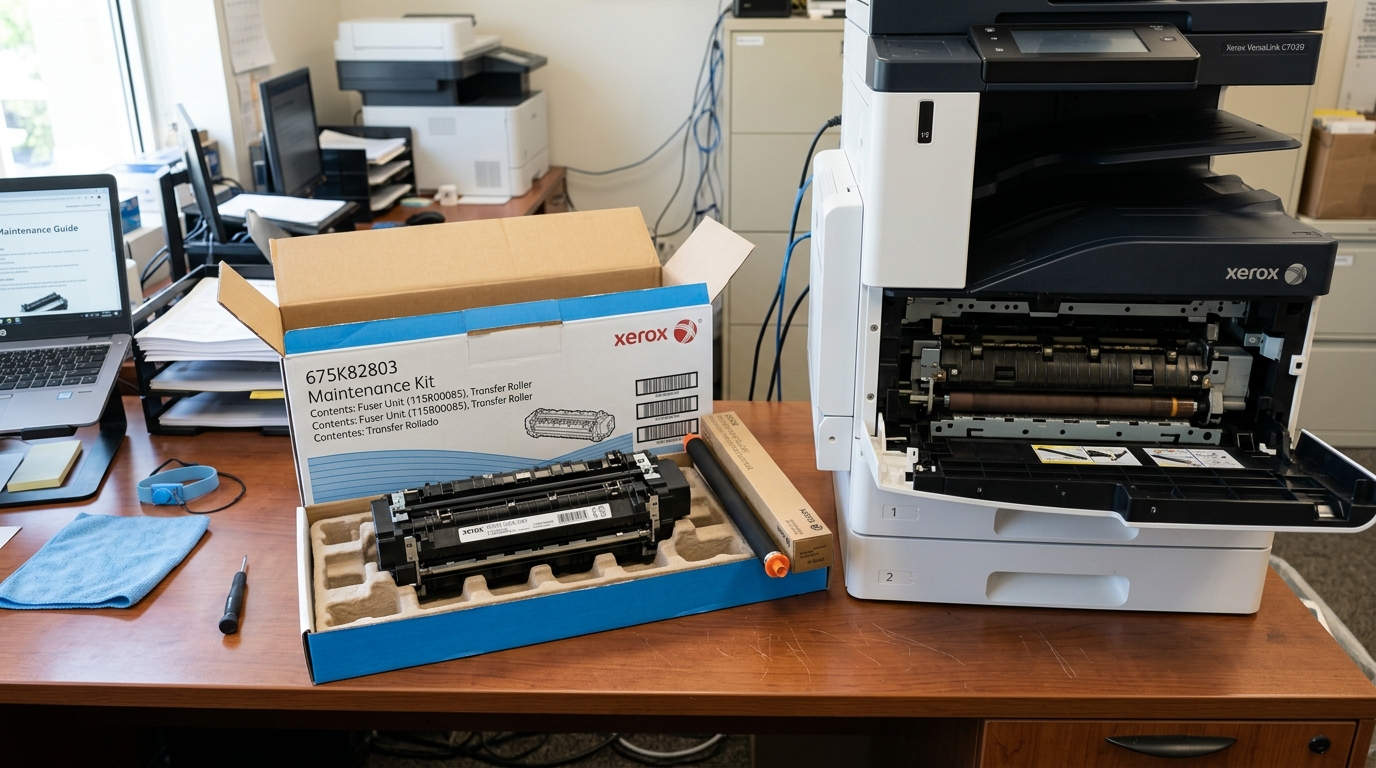
Introduction to Xerox Maintenance Kits
Maintaining a Xerox laser printer, whether it's a small office VersaLink or a high-capacity AltaLink model, requires periodic replacement of critical internal components. Xerox simplifies this process by offering comprehensive Maintenance Kits.
Which typically include a new fuser assembly, a transfer roller, and sometimes pickup and feed rollers. Over time and extensive use, these parts degrade due to heat, friction.
And toner accumulation, leading to paper jams, poor print quality, smudging, and recurring error codes. This guide will walk you through the importance of Xerox maintenance kits, how to identify when a replacement is necessary.
And detailed instructions on how to safely and effectively replace the fuser and transfer rollers. Understanding the mechanics of your printer not only extends the lifespan of the machine.
But also ensures that your business documents maintain a professional, crisp appearance. The fuser uses high heat and pressure to melt toner into the paper fibers.
While the transfer roller electrically charges the paper to pull the toner from the drum. When these components fail, the entire printing process breaks down.
By proactively managing your printer's maintenance schedule. And mastering the installation process, you can prevent costly service calls and unexpected workflow interruptions.
Why This Happens
The degradation of fusers and transfer rollers is a natural consequence of the laser printing process. The fuser unit operates at extreme temperatures—often exceeding 400°F (200°C)—to fuse the toner powder to the paper.
Over thousands of pages, the non-stick coating on the fuser's hot roller can wear away or become scratched by paper clips, staples, or heavy cardstock. When this coating degrades, toner starts sticking to the fuser itself, causing repeated smudges, ghosting (faint repetitions of the image down the page), or accordion-style paper jams at the printer's exit.
Similarly, the transfer roller is made of a conductive, spongy foam material that applies a static charge to the paper. With prolonged use, paper dust, loose toner.
And environmental humidity can clog the pores of the transfer roller, reducing its electrical conductivity. This results in faded prints, mottled textures, or completely blank pages.
Because the toner is not effectively pulled from the photoreceptor drum onto the paper. Furthermore, the rubber pickup and feed rollers (often included in maintenance kits) lose their grip over time, becoming slick and smooth.
Which leads to misfeeds, double-feeds, and "load paper" errors even when the tray is full. Modern Xerox printers track the page count for these components.
And will issue a "Replace Maintenance Kit" warning when they approach the end of their rated life.
Step-by-Step Fix
Follow these steps to safely replace the fuser and transfer roller using a Xerox Maintenance Kit. WARNING: The fuser is extremely hot. Allow the printer to cool for at least 30 minutes before starting.
- Power Down. And Prepare: Turn off the Xerox printer using the main power switch and unplug it from the wall outlet. Wait at least 30 minutes for the internal components, particularly the fuser, to cool down completely to avoid severe burns.
- Locate and Remove the Old Fuser: Open the rear door or the specific side access panel indicated in your manual. The fuser is usually a large module with warning labels about heat. Release the locking levers or unscrew the thumb screws holding the fuser in place. Carefully pull the fuser straight out of the printer by its handles.
- Install the New Fuser: Remove the new fuser from its packaging, being careful not to touch the internal rollers. Slide the new fuser firmly into the tracks until it seats completely into the printer. Lock the levers or tighten the thumb screws to secure it.
- Locate and Remove the Transfer Roller: Open the front cover or top cover to access the imaging area. The transfer roller is a long, black, spongy roller. Use the provided hook tool (or carefully use a flathead screwdriver) to unclip the left and right retaining latches. Lift the old transfer roller out. Avoid touching the sponge material of the new roller.
- Install the New Transfer Roller: Holding the new transfer roller by its plastic end caps, align it with the mounting slots. Snap the gear side into place first, then press down on the opposite end until the retaining clips click, securing the roller firmly.
- Replace the Feed Rollers (If Included): Remove the paper trays. Locate the pickup rollers hanging down inside the cavity. Pinch the retaining clips on the ends of the rollers to slide them off the shaft. And slide the new rollers on until they click.
- Reset the Maintenance Counter: Plug the printer back in and turn it on. Navigate to the printer's control panel menu (usually under Administration > Tools > Maintenance or Supply Status). And select the option to reset the Fuser/Maintenance Kit life counter to 100%.
Advanced Troubleshooting
If you have installed a new maintenance kit and are still experiencing issues, further diagnosis is required. If paper jams continue at the fuser exit, inspect the exit sensor flags.
These small plastic levers can become dislodged or broken during the installation of a new fuser, causing the printer to falsely register a jam. Carefully snap them back into place if dislodged.
If print quality issues like faded text persist after replacing the transfer roller, the problem likely lies with the toner cartridge or the imaging drum unit, not the transfer roller. Verify that the high-voltage contacts inside the printer (where the transfer roller sits) are clean.
And free of toner dust, as dirty contacts will prevent the transfer charge from functioning. If the printer control panel refuses to acknowledge the new maintenance kit.
And continues to display the replacement warning, the fuser might not be seated correctly, or the electrical connector at the back of the fuser is damaged. Remove the fuser, inspect the connector pins for bending, and firmly reinstall it.
For advanced network management, administrators can access the Xerox CentreWare Web interface to remotely clear faults, verify supply levels. And ensure the firmware (internal software) is up to date, which can sometimes resolve erroneous maintenance alerts.
FAQ
How often do I need to replace a Xerox Maintenance Kit?
The lifespan depends on the printer model, ranging from 100,000 to over 300,000 pages. The printer will track usage.
Can I replace just the fuser instead of the whole kit?
While you can purchase fusers individually, it is highly recommended to replace the entire maintenance kit at once. If the fuser is worn out, the transfer roller and feed rollers are likely at the end of their lifespan as well.
Why is my printer still saying "Replace Fuser" after installing a new one?
Unlike toner cartridges, most maintenance kits do not have a smart chip to auto-detect replacement. You must manually reset the maintenance counter through the printer's administrative menu on the control panel.
Is it safe to touch the transfer roller?
No. Oils.
What causes "ghosting" on my printed pages?
Ghosting, where faint images of text repeat down the page, is typically caused by a failing fuser that is not getting hot enough, or the non-stick coating has worn off, causing toner to stick to the fuser roller. And deposit on the next revolution.
