


Introduction
Xerox multifunction printers (MFPs) and production presses are renowned for their robust finishing capabilities. Allowing organizations to produce professionally bound, stapled, and hole-punched documents entirely in-house.
The advanced finisher units attached to these machines are complex electromechanical marvels.However, this complexity means that they are susceptible to a specific range of malfunctions. Primarily categorized under the 077-xxx series of error codes.
When your Xerox machine throws an 077 error, document production grinds to an immediate halt.These faults can range from simple stapler jams and misaligned paper paths to more severe issues involving failed sorter motors. Broken drive belts, or malfunctioning optical sensors.
Navigating these errors requires a methodical approach.The finisher unit operates by receiving printed sheets, aligning them perfectly in a compiler bin. And then applying the desired finishing touch (stapling, punching, folding) before ejecting the set.
Any disruption in this sequence triggers an immediate fault to prevent damage to the mechanism or the tearing of documents.This guide is designed to explain the Xerox 077 error family. Explain the underlying mechanics of why these finishers jam, and provide you with a comprehensive, step-by-step resolution process.
We will cover advanced troubleshooting for persistent faults and address frequently asked questions to ensure your high-volume printing operations remain uninterrupted.
Why This Happens
The 077-xxx error codes specifically designate a fault within the finisher module. Understanding the mechanics of the finisher helps in diagnosing the root cause.
When paper exits the main printer engine, it enters a transport module that directs it to the finisher. Inside the finisher, the paper is fed into a compiler tray where tamper guides align the sheets.Once a set is compiled, the stapler head actuates, or the hole punch mechanism fires.
And the ejector belts push the finished set onto the output tray.
Here are the primary reasons why you encounter 077 errors:
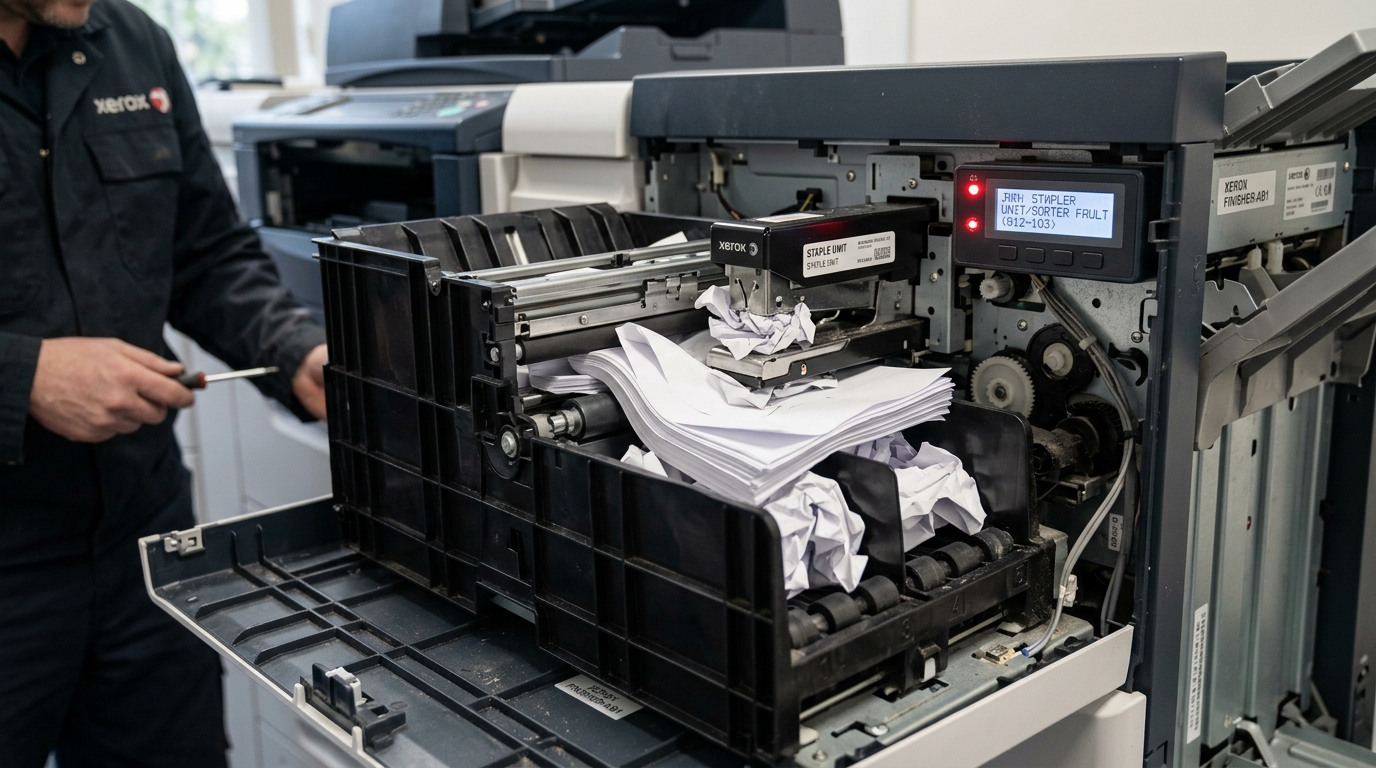
- Staple Jams (077-9xx usually): This is the most frequent culprit. The stapler cartridge uses a ribbon of staples.If the stapler mechanism gets dirty, if the staples are slightly bent due to environmental moisture. Or if the machine attempts to staple a set that exceeds its maximum sheet capacity, a staple will crumple inside the firing head. This prevents the mechanism from returning to its home position, triggering a hard fault.
- Paper Path Obstructions:Tiny scraps of paper, sometimes no larger than a postage stamp. Can tear off and lodge themselves over optical sensors or within the narrow guide channels of the finisher. The machine's sensors register paper present when there shouldn't be, causing a sequence error.
- Sensor Contamination: The finisher relies on dozens of optical photo-interrupter sensors to track the leading and trailing edges of the paper. Over time, paper dust and toner particles accumulate on these sensors, blinding them and causing timing faults (e.g., 077-101, 077-104).
- Mechanical Wear and Tear: The ejector belts, drive gears, and the compiler tamper motors undergo immense stress. Belts can stretch or snap, gears can strip teeth, and motors can burn out. If the compiler cannot align the paper, or the ejector cannot push it out, an 077 error is generated.
- Communication Errors: The finisher must communicate precisely with the main printer engine. Loose communication cables or a failing finisher control board can result in synchronization errors, leading the printer to halt operations.
Step-by-Step Fix
Resolving an 077 finisher error requires patience and a careful physical inspection. Never force any moving parts within the finisher. Follow these detailed steps to clear the fault safely and effectively.
- Identify the Specific Fault Code: Look closely at the UI panel. It will display a code like 077-300 (Finisher Front Door Open), 077-111 (Compiler Jam), or 077-900 (Stapler Jam). Note this exact code, as it dictates where you should focus your efforts.
- Power Down and Disconnect: While some minor jams can be cleared with the machine on, persistent 077 errors require power cycling. Turn off the printer. Wait 30 seconds, then unplug the finisher module's power and data cables from the main printer (if it is a detached high-capacity finisher).
- Clear the Main Paper Path: Open the front door of the finisher. You will see several green levers and dials. Turn the green dials in the direction indicated by the arrows to manually advance any stuck paper. Carefully pull the paper out in the direction of the normal paper flow to avoid tearing it. Check areas 1a, 1b, and 1c as labeled on the inside of the door.
- Address Stapler Jams (If Applicable): If the error points to the stapler (e.g., 077-909), locate the stapler unit (usually a pull-out drawer mechanism designated by a green handle). Slide the stapler unit out. Remove the staple cartridge. Look inside the nose of the stapler for crumpled staples. Use needle-nose pliers to carefully extract any jammed staples. Ensure the staple ribbon in the cartridge is flat and protruding correctly before reinserting it. Close the stapler drawer securely.
- Clean the Optical Sensors:Using a can of compressed air or a lint-free cloth lightly dampened with isopropyl alcohol. Clean the visible sensors in the paper path. Look for small black plastic U-shaped components with an LED on one side and a receiver on the other. Gently blow away any accumulated paper dust.
- Inspect the Compiler Bin and Ejector Belts: Look at the area where the paper is gathered before stapling (the compiler). Check for torn pieces of paper lodged underneath the tamper guides. Inspect the rubber ejector belts; if they look cracked, glazed, or loose, they may need replacement.
- Reassemble and Initialize: Close all doors securely. Ensure the finisher is tightly docked to the main printer. Reconnect the cables and turn the printer on. The machine will undergo a self-test. You should hear the finisher motors cycling and the stapler head finding its home position. If the error clears, run a test print with stapling to verify.
Advanced Troubleshooting
If the standard clearing procedures fail and the 077 error persists upon startup. You are likely facing a hardware failure that requires deeper intervention.
Finisher Control Board (FCB) Diagnostics:A persistent error despite a clear paper path often points to a blown fuse on the Finisher Control Board . A failure of the board itself.
Accessing the FCB usually requires removing the rear panels of the finisher. A multimeter can be used to check continuity on the board's fuses.
If a fuse is blown, it must be replaced with one of the exact same rating.
Motor and Solenoid Testing:Enter the Xerox diagnostic mode (typically by holding 0 for 5 seconds. Then pressing Start, and entering the passcode, usually 6789).
Navigate to Component Control or Output Check. Here, you can manually trigger specific motors and solenoids within the finisher using their NVM chain-link codes (e.g., 077-001 for the compiler motor).
This allows you to isolate which specific component is failing to actuate.
Sensor State Monitoring: While in diagnostic mode, use the Input Check feature to monitor the state of the finisher's sensors (High/Low).Manually insert a piece of paper into the sensor path . Watch the diagnostic screen to see if the state changes.
If a sensor fails to toggle, it is defective and must be replaced.
Drive Belt Replacement:If you hear the motor spinning but the mechanisms aren't moving. A drive belt has likely snapped or slipped off its pulley.
This requires significant disassembly of the finisher frame to access the gear train.Ensure you have the service manual for your specific finisher model before attempting this. As the timing of the gears is critical.
FAQ
Can I just bypass the finisher and print normally if I have an 077 error?
If the error is a hard fault (like a blown FCB). You can physically undock the finisher from the main engine, change the settings in the printer's UI (under Machine Status > Tools) to indicate no finisher is attached.
Why does the stapler jam only when I staple large documents?
If you attempt to staple thicker paper, cover stock, or exceed the maximum sheet count. The staple cannot penetrate the stack and crumples against the anvil, causing a jam.
What does "Finisher Interlock Open" mean?
This means one of the doors or access panels on the finisher is not fully closed. If a door is slightly ajar, or if the plastic actuator on the door that depresses the switch is broken.
How often should I clean the finisher sensors to prevent these errors?
In a high-volume environment (printing tens of thousands of pages a month). You should blow out the finisher paper path and clean the sensors with compressed air every month.
