


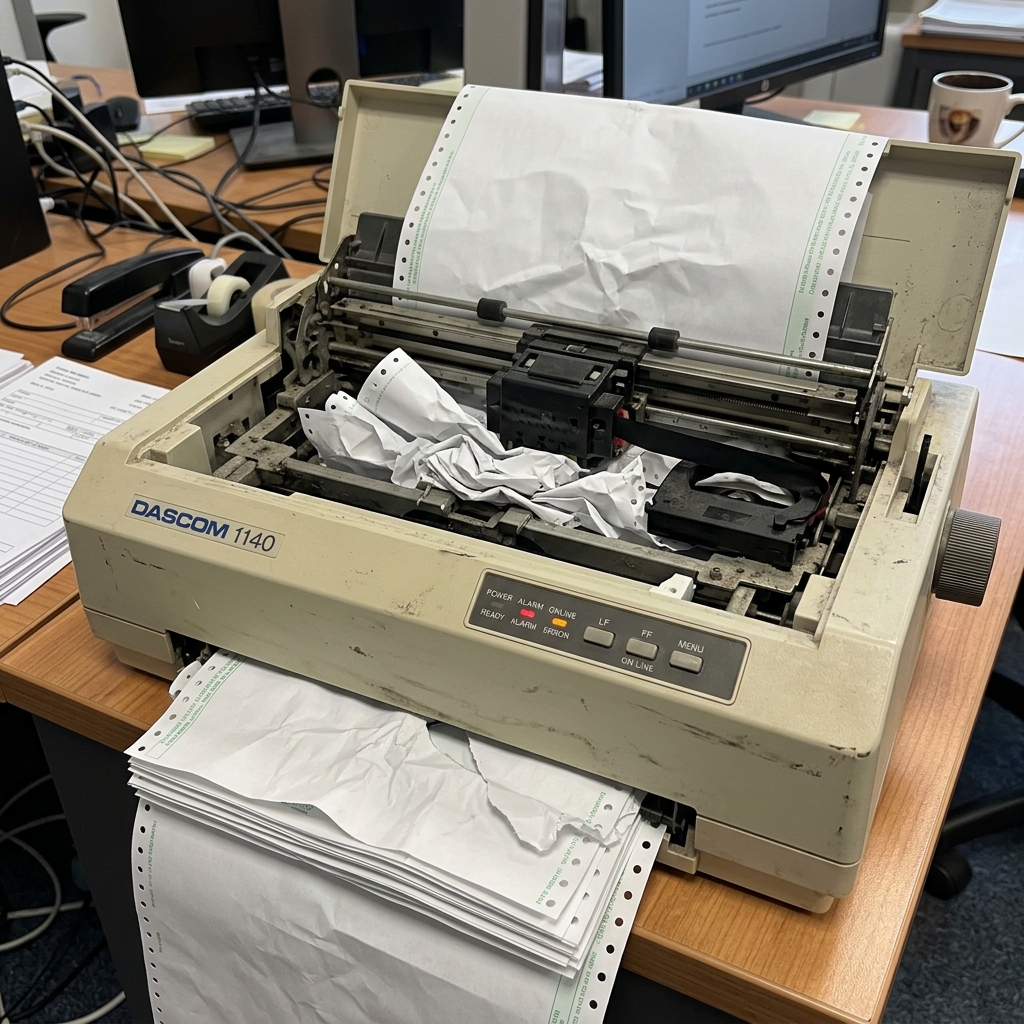
Introduction to the Dascom 1140 Paper Feed Issue
The Dascom 1140 is a reliable and compact 9-pin dot matrix printer. Highly favored in logistics, retail, and back-office environments for its ability to quickly print multi-part forms, invoices, and shipping manifests.
Despite its rugged design and durable mechanisms, users frequently encounter an issue where the. Printer simply refuses to feed paper, halting operations and causing significant frustration.
This paper feeding error can manifest in several ways: the printer may make grinding noises without moving the paper. The paper may slip and misalign, or the printer might display an error light indicating a paper jam even when the paper path appears clear.
Resolving this issue promptly is critical to restoring workflow efficiency and preventing potential damage to the printer's delicate internal components. In this comprehensive troubleshooting guide, we will explore the root causes of the Dascom 1140 paper feeding errors.
And provide detailed, actionable steps to diagnose and repair the problem.
The paper handling system of the Dascom 1140 involves a complex interplay of physical components. Including the platen roller, friction feed rollers, tractor feed pins, stepper motors, and optical sensors.
A failure or misalignment in any of these components can disrupt the delicate process of pulling paper through the machine. Whether you are using continuous tractor-fed paper for bulk invoicing or single-sheet friction feed for individual receipts.
Understanding how the printer expects the paper to be loaded and advanced is the first step toward troubleshooting. By following the systematic approach outlined below, ranging from simple mechanical checks to sensor cleaning.
You can effectively resolve the 'not feeding paper' error and keep your Dascom 1140 running smoothly for years to come.
Why This Happens: The Mechanics of Paper Feeding Failures
Paper feeding issues on the Dascom 1140 generally fall into three main categories: mechanical obstructions. Incorrect paper path settings, and sensor malfunctions.
Mechanical obstructions are the most common and easily identifiable cause. Over time, small scraps of paper, adhesive residue from labels.
Or accumulated paper dust can build up in the paper path. This debris can block the paper from advancing.
Coat the friction rollers (reducing their grip), or interfere with the tractor feed pins. When the printer's stepper motor attempts to advance the paper and encounters this resistance.
It may slip, causing the grinding noise often associated with feed errors. Additionally, using paper that is too thick.
Too thin, or heavily curled can prevent the rollers from properly engaging the media.
Incorrect paper path settings are another frequent culprit, especially in environments where users switch between continuous forms and single sheets. The Dascom 1140 utilizes a mechanical lever to switch between tractor feed. (for continuous paper with holes) and friction feed (for single sheets).
If this lever is in the wrong position. The printer will attempt to use the wrong mechanism to pull the paper, resulting in immediate feed failure.
Finally, sensor malfunctions can cause the printer to falsely report paper errors. The printer relies on optical sensors to detect the presence of paper and the position of the printhead.
If paper dust covers the sensor lens, or if the sensor is misaligned due to a physical jolt. The printer's logic board may 'think' there is a jam or that the printer is out of paper, halting the feed mechanism completely as a safety precaution.
Step-by-Step Fix: Resolving Dascom 1140 Paper Feed Errors
Follow these detailed steps to diagnose and fix paper feeding issues on your Dascom 1140 printer. These steps progress from simple settings checks to more involved cleaning and maintenance.
- Verify the Paper Release Lever Position: Locate the paper release lever, usually found on the top or side of the printer. If you are using continuous tractor paper, ensure the lever is pushed towards the rear (Tractor position). If using single sheets, pull the lever towards the front (Friction position). An incorrect lever setting is the #1 cause of feed failure.
- Check the Paper Loading: Remove the paper and reload it carefully. For continuous forms, ensure the holes align perfectly with the tractor pins and that the paper is straight. The paper should have a small amount of tension but should not be pulled tightly. For single sheets, insert the paper squarely into the top feed slot until you feel resistance from the rollers.
- Clear the Paper Path: Turn off the printer and open the top cover. Remove the ribbon cartridge to gain clear visibility of the platen roller and paper path. Use a flashlight to inspect for torn pieces of paper. Label backing, or foreign objects lodged underneath the platen or around the tractor mechanisms. Carefully remove any debris using tweezers.
- Clean the Friction Rollers: If using single sheets and the paper slips or feeds unevenly, the rubber friction rollers are likely dirty or glazed. Lightly dampen a lint-free cloth with isopropyl alcohol (rubbing alcohol). And gently wipe the rubber rollers while slowly turning the platen knob. This removes paper dust and restores the rollers' grip.
- Inspect the Tractor Feed Pins: For continuous forms, inspect the plastic pins on the tractor mechanisms. If any pins are broken, bent, or missing, the tractor assembly will not feed paper correctly and must be replaced. Also, ensure the tractor guides are spaced correctly to match the width of your paper.
- Clean the Paper Sensors: Locate the optical paper sensors, usually situated near the paper entrance path beneath the platen. Use a can of compressed air to gently blow away any accumulated paper. Dust that might be blinding the sensors and causing false jam errors.
- Check the Platen Gap (Head Gap) Lever: If you are printing on thick multi-part forms. The printhead might be too close to the platen, causing excessive drag and preventing the paper from feeding. Adjust the head gap lever (usually numbered 1-5. Or similar) to a higher setting to increase the clearance for thicker paper.
- Perform a Manual Feed Test: With the printer off, try manually turning the platen knob on the side of the printer. The paper should advance smoothly without excessive resistance. If the knob is extremely hard to turn. There may be a jammed gear or a severe obstruction requiring partial disassembly.
- Reset the Printer Logic: Sometimes, the printer's internal logic state becomes confused after a jam. Turn the printer off, disconnect the power and data cables for 30 seconds. Reconnect the cables, turn the printer back on. And attempt a self-test print (often initiated by holding the LF/FF button while turning the power on).
- Update Firmware (internal software) (Rare but possible): While uncommon for feed issues, ensure your printer firmware (internal software) is up to date. As manufacturers occasionally release patches that improve motor timing and sensor debouncing logic. Consult the Dascom support website for firmware (internal software) utilities.
Advanced Troubleshooting: Deep Cleaning and Component Replacement
If the step-by-step guide fails to resolve the issue, the problem may lie deeper within the printer's mechanical assembly. Over years of heavy use, the gears driving the platen and tractor assemblies can wear down or strip.
If you hear a high-pitched whining or a rapid clicking sound when the printer attempts to feed. Accompanied by no paper movement, a gear is likely stripped.
Replacing these gears requires disassembling the printer casing and carefully noting the position of timing belts and tension springs. Unless you have experience with electromechanical repair, this procedure is best left to an authorized service technician.
Another advanced issue is a failing stepper motor. The stepper motor provides the precise rotational force needed to advance the paper line by line.
If the motor's internal coils degrade or its bearings seize up. It will lose torque and fail to pull the paper, especially heavier multi-part forms.
You can test a stepper motor with a multimeter by measuring the resistance. Across its coil windings to check for shorts or open circuits.
If the motor is faulty, a replacement part must be sourced. Additionally, inspect the logic board for blown capacitors or damaged motor driver ICs.
Which could prevent the motor from receiving adequate power.
FAQ: Dascom 1140 Paper Feed Questions
Why does the paper feed skewed or crooked?
Skewed feeding is usually caused by uneven tension. For continuous forms, ensure both left.
The printer makes a loud grinding noise but doesn't pull paper. What is broken?
A loud grinding noise indicates that the stepper motor is turning. But the mechanical linkage to the paper rollers is slipping or blocked.
How do I adjust the printer for thick multi-part forms?
To print on thick forms (like 4-part carbonless paper), you must increase the distance between the printhead. And the platen roller to prevent the printhead from dragging and tearing the paper.
My printer keeps saying "Paper Out" even when paper is loaded.
This is almost certainly a sensor issue. The optical paper sensor beneath the platen is likely covered in paper dust, preventing it from detecting the loaded paper.
Should I lubricate the paper feed mechanisms?
Generally, no. You should never apply oil, WD-40, or grease to the rubber platen roller or the plastic tractor gears.
