


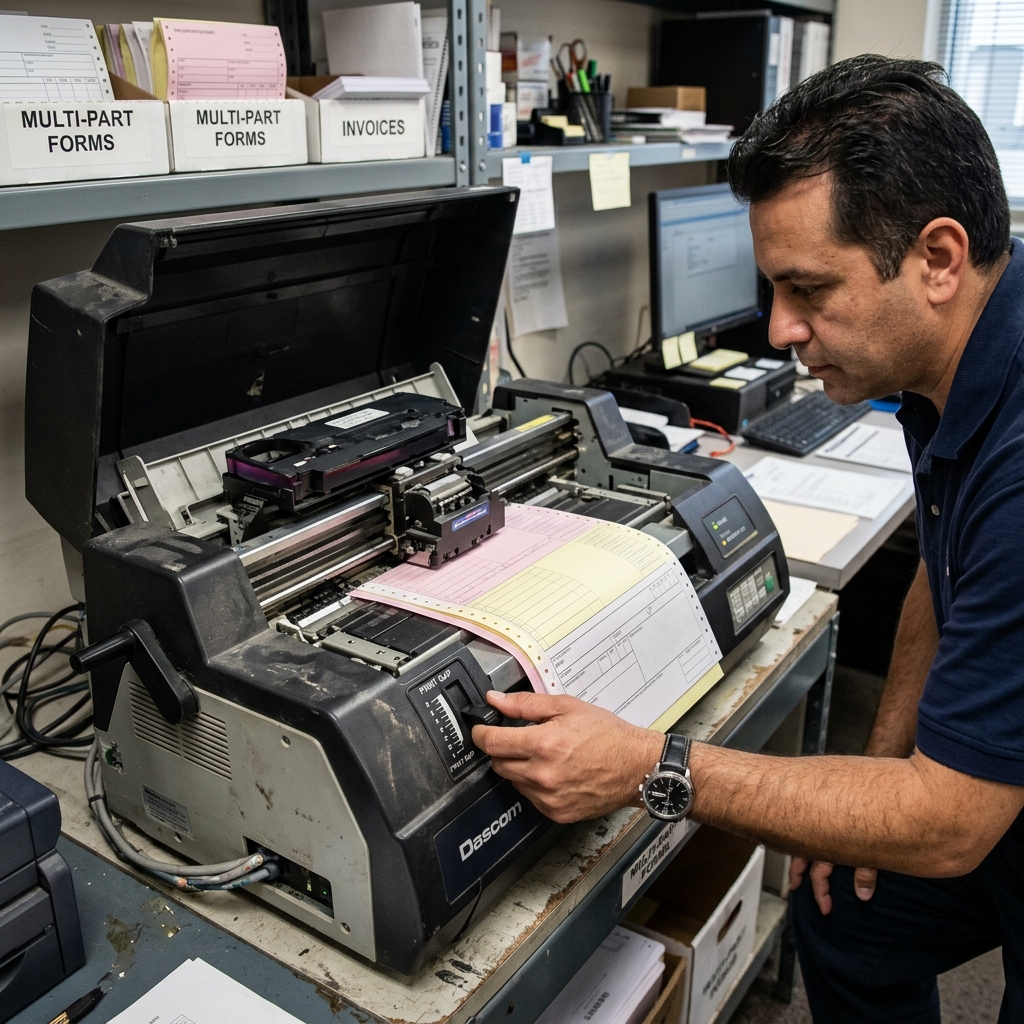
Adjusting the print head gap on Dascom printers is a basic maintenance task. It ensures optimal print quality.
It prevents premature wear on the print head and the platen. The print head gap is the physical distance between the print head pins and the paper.
Getting this setting right is critical. You must adjust it when switching between different media types.
If the gap is too narrow, the print head will drag. This causes smudging and ribbon jams.
It can damage the print head pins. If the gap is too wide, characters look faint or fuzzy.
Documents become unreadable. This guide covers Dascom print head gap adjustment.
It explains the mechanics and how to calibrate it perfectly.
Why This Happens
Impact printing causes the need for print head gap adjustment. Dascom printers rely on mechanical force. They transfer ink from a ribbon onto paper. The print head fires its pins a specific distance with specific force. Here are reasons why gap adjustment is necessary.
First, changing the media type is the most common reason. A standard 20 lb bond paper requires a specific gap setting.
A 6-part carbonless form requires a very different setting. Multipart forms are significantly thicker.
They require more force to push through all layers. Setting the gap for single-sheet paper compresses thick forms too much.
This causes excessive friction and tears the ribbon. It can break the delicate pins within the print head.
Second, normal wear and tear over time affects the gap. The platen is the rubber roller the paper rests against.
It can harden or wear down slightly. The carriage mechanism moves the print head side to side.
It may develop slight play. These minute changes alter the distance between the print head and the paper.
This requires a recalibration of the gap.
Third, extreme temperature changes can cause slight expansion or contraction of parts. Modern Dascom printers withstand rugged environments. Precision settings can still drift over long periods of heavy use.
Finally, improper user actions can alter the baseline position. Forcing the platen knob can skip the gears. Pushing the print head carriage aggressively causes problems. This requires a complete reset of the settings.
Step-by-Step Fix
- Preparation and Safety: Power off the Dascom printer. Unplug it from the wall. Dot matrix print heads become extremely hot. Allow the printer to cool down for at least 15 minutes before adjusting it.
- Locate the Gap Adjustment Lever: Open the top cover of the printer. Find the print head gap adjustment lever or dial. This is usually on the left or right side of the carriage. Refer to your Dascom model's user manual for the exact location.
- Understand the Scale: The adjustment mechanism features a numbered scale. A lower number is for thin paper. Higher numbers are for thick, multipart forms. Some models have specific markings for envelopes.
- Load the Target Media: Load the specific paper you intend to use. Use the tractor feed or friction feed mechanism. Make sure it is properly seated and tensioned.
- Initial Setting based on Forms: Set the gap adjustment lever to match the parts in your form. Start by setting the lever to position 3 or 4 for a 3-part form. Start at position 1 or 2 for single-sheet paper.
- Perform a Self-Test Print: Power the printer back on. Most Dascom printers have a built-in self-test feature. Hold down the correct buttons while powering on to initiate the test. Observe the print quality.
- Fine-Tuning the Gap: The gap is too wide if the print is faint. Move the lever one notch closer and test again. The gap is too narrow if the print is smudged. Move the lever one notch wider.
- Check for Ribbon Wear: Inspect the ribbon after printing a few pages. The gap is likely too tight if the ribbon shows tearing or fraying. Increase the gap setting.
- Final Calibration: Make small adjustments and run test prints. Continue until the text is crisp and clear. The adjustment is complete when optimal quality is achieved.
- Document the Setting: Note the optimal gap setting for different forms. Attach a label to the printer. This prevents guesswork and reduces downtime.
Advanced Troubleshooting
You may still experience print quality issues after adjusting the gap. There may be deeper mechanical or electronic problems. Here are advanced troubleshooting steps to consider.
Print Head Wear: Dot matrix print heads have a finite lifespan. The pins can wear down or break over time.
They can become stuck from ink dust. Adjusting the gap does not fix missing dots.
You may need to clean the print head with a solvent. You might need to replace the entire assembly.
Carefully remove the print head and inspect it.
Platen Damage: The platen roller provides a smooth surface for the pins. A pitted or scarred platen causes uneven print quality. Inspect the platen for deep grooves. A damaged platen must be replaced by a technician.
Carriage Belt Tension: A loose carriage belt causes erratic print head movement. This leads to blurry characters. Check the tension of the carriage belt. It should be taut but not overly tight. Replace a frayed or stretched belt.
Sensor Calibration: Some printers feature automatic gap adjustment sensors. A dirty sensor may set the gap incorrectly. Clean the sensor area with compressed air. Refer to the service manual to recalibrate the sensor.
Firmware Issues: Firmware bugs can affect the print head firing force. Check the Dascom support website for firmware updates. Apply updates using the recommended utility.
FAQ
How often should I adjust the print head gap?
Adjust the print head gap when you switch paper types. You only need to adjust it for the same media if print quality degrades.
What happens if I set the gap too tight?
Setting the gap too tight is the most common cause of damage. It causes excessive friction and severe ribbon wear.
Can a worn ribbon cause issues similar to an incorrect gap setting?
Yes, a depleted ribbon produces faint print. This looks identical to a gap that is too wide.
My printer has an "Auto Gap" feature. Do I still need to adjust it manually?
Printers with Automatic Gap Adjustment adjust automatically. However, these sensors can sometimes fail or get dirty.
Is it safe to adjust the gap while the printer is actively printing?
No, pause or stop printing before adjusting the lever. Adjusting it while the carriage is moving can jam the mechanism.
