


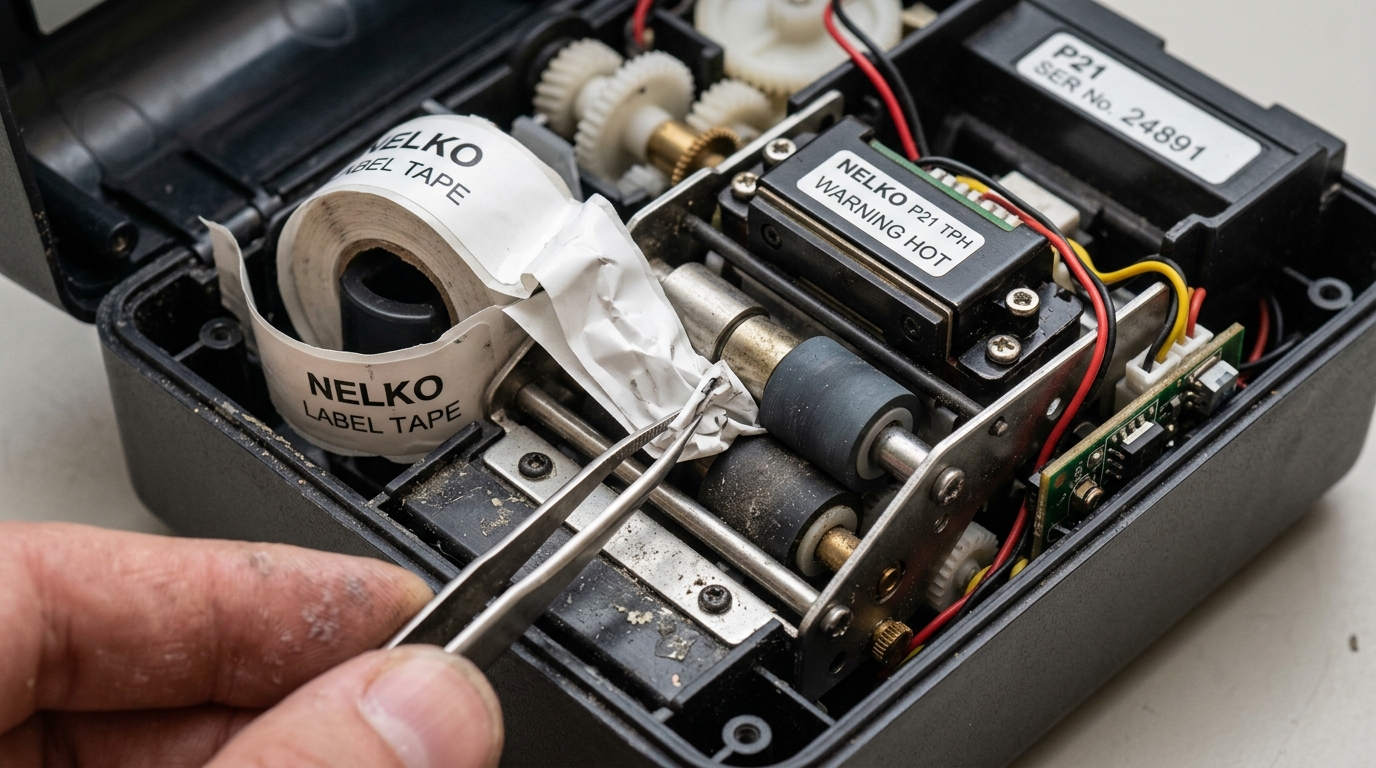
Nelko produces a variety of compact, affordable Bluetooth label makers that have become incredibly popular for home organization, small business inventory, and crafting. Two of their most common models, the Nelko P21 and the PL70e, often cause confusion among buyers regarding their capabilities and intended use cases.
While both utilize direct thermal technology and connect via Bluetooth to smartphone applications, they have distinctly different form factors, media handling mechanisms, and software ecosystems. Furthermore, users of both models frequently encounter a frustrating issue where the continuous label tape fails to feed correctly, resulting in overlapping prints, grinding noises, or completely blank output.
This guide demystifies the differences between the P21 and PL70e, provides a definitive setup workflow, and offers technical solutions to resolve chronic tape feeding malfunctions.
Why This Happens
Why This Happens: The Mechanics of Tape Feeding Failures
Tape feeding issues in compact label makers like the Nelko P21 and PL70e are almost entirely mechanical, stemming from user error during media loading or degradation of the internal transport path. The primary causes include:
1.
Incorrect Tape Orientation: Direct thermal labels only have one heat-sensitive side. If the spool is inserted backwards, the thermal print head applies heat to the slick backing material instead of the label surface, resulting in a blank print and often causing the backing to slip against the drive roller.
2.
Unspooled or Slack Tape: If the label roll is loose or has unspooled inside the chamber, the stepper motor will struggle to pull the tape evenly. The slack causes the labels to bunch up behind the cutter blade or print head, leading to a physical jam and a grinding sound from the gears.
3.
Dirty Platen Roller: The rubber platen roller is responsible for gripping the label backing and pulling it forward. Over time, adhesive residue from cheap labels, paper dust, and oils from fingers can coat the roller.
This reduces friction, causing the tape to stall while the print head continues to fire, resulting in compressed, overlapping, or dark, illegible text.
4. Optical Sensor Misalignment: These printers use a small optical sensor (a photodiode and emitter) to detect the gap between die-cut labels.
If dust or a piece of torn label covers this sensor, the printer cannot determine where one label ends and the next begins, causing it to feed continuously or stop randomly.
5. Incompatible Media: While they may look similar, different label makers require specific spool core sizes and index marks (black marks on the back of the tape).
Using third-party tape designed for a Niimbot or Phomemo in a Nelko printer may result in feeding errors due to physical incompatibility with the spindle.
Step-by-Step Fix and Setup Guide
- Understand the Differences (P21 vs PL70e): The Nelko P21 is typically a smaller, entry-level continuous tape labeler, ideal for basic text labels. The PL70e is often designed to handle wider media and sometimes die-cut (pre-sized) labels, making it better for barcodes, QR codes, and address labels. Ensure you download the correct corresponding app specified in your manual, as the hardware protocols differ.
- Clear the Feed Path: Power off the device. Open the media compartment. Remove the label roll. Inspect the interior under a bright light. Use a pair of precision tweezers to remove any torn paper bits, stuck labels, or adhesive remnants wrapped around the rubber roller or the thermal head.
- Clean the Roller and Sensor: Lightly dampen a cotton swab with 90%+ isopropyl alcohol. Gently scrub the black rubber platen roller while rotating it with your thumb to clean the entire circumference. Locate the small optical sensor window (usually a small glass or plastic lens near the feed path) and wipe it clean. Allow all alcohol to evaporate completely (about 5 minutes).
- Re-tension the Label Spool: Take the label roll in your hands and gently twist it to tighten any slack. The roll should be firm and compact. Pull out about 1 inch (2.5 cm) of tape so it extends past the spool.
- Load with Correct Orientation: Insert the spool into the printer. CRITICAL: Ensure the printable side of the label is facing TOWARDS the thermal print head (which is usually located on the lid or the upper assembly). The tape should route over the rubber roller, not under it.
- Perform a Manual Calibration Feed: Close the lid firmly until it clicks on both sides. Turn the printer on. Most Nelko printers have a physical feed button or a power button that doubles as a feed button when tapped once. Press it once to allow the printer to eject a blank label or a short strip of tape. This process calibrates the gap sensor and aligns the leading edge.
- Configure the App Settings: Open the Nelko app. Connect via Bluetooth. Navigate to the label settings for your current project. Ensure you have selected the correct label type (Continuous vs. Gap/Die-cut) and the precise dimensions (e.g., 12mm x 40mm) that match the physical roll installed. Mismatched dimensions will cause the software to miscalculate the feed distance.
- Test Print and Adjust Density: Create a simple text label and print. If the tape feeds correctly but the text is faint, go into the app's printer settings and increase the Print Density. If the tape slips, you may need to apply slight pressure to the lid while printing to ensure the roller engages, which indicates a worn hinge or latch mechanism.
Advanced Troubleshooting
Advanced Troubleshooting If you have thoroughly cleaned the device and are using official Nelko media, but the printer still emits a clicking or grinding noise without feeding tape, the internal stepper motor gears may have stripped, or the drive belt may have slipped off its pulley. This usually occurs if a severe jam was forcefully pulled out while the motor was engaged.
Unfortunately, these compact devices are generally ultrasonically welded or use snap-fit plastic clips that are difficult to disassemble without breaking the chassis. If the device is under warranty, contact Nelko support for a replacement.
If you are comfortable with micro-electronics repair, you can carefully pry the casing apart using a spudger, locate the gear train near the stepper motor, and realign the gears or apply a minuscule amount of silicone grease to the plastic cogs. Additionally, if the Bluetooth connection drops immediately when the print command is sent, the internal battery may have a degraded cell that cannot supply the peak current required by the thermal head and motor simultaneously.
Try operating the printer while it is plugged directly into a high-wattage wall charger to bypass the battery temporarily.
FAQ
Can I use continuous tape in a printer designed for die-cut labels?
Usually, yes, but you must change the media type setting in the application from 'Gap' to 'Continuous'. If you do not change this setting, the printer will feed continuously looking for a gap that doesn't exist, wasting a massive amount of tape.Why does my text print off-center or cut off at the edges?
This is caused by defining the wrong label size in the app. If you have a 12mm tape installed but the app canvas is set to 15mm, the software will attempt to print outside the physical boundaries of the media. Always double-check your canvas dimensions before printing.Are the labels waterproof or resistant to fading?
Standard direct thermal labels are water-resistant but highly susceptible to heat, UV light, and certain chemicals (like hand sanitizer or alcohol). They will fade or turn completely black if left in a hot car or exposed to direct sunlight for extended periods. For durable labels, you need a thermal transfer printer with a resin ribbon, not a direct thermal device.How do I factory reset the Nelko printer?
For most Nelko models, a factory reset can be performed by turning the device on, then using a paperclip to press the recessed 'Reset' button (often located near the USB port or on the bottom) for 5 seconds. Alternatively, delete the printer from the app, clear your phone's Bluetooth cache, and re-pair.Disclaimer: Before proceeding with any hardware modifications, firmware flashes, or deep driver configurations, it is absolutely essential to ensure that your operating system is fully up to date and that you have backed up any critical print spooler configurations.
Thermal and dot matrix printers, along with modern network enterprise printers, frequently interact with low-level system APIs (such as the Windows Print Spooler service, CUPS on macOS/Linux, or proprietary vendor port monitors).
Modifying these parameters without a solid understanding of your network topology, USB root hub power management settings, and driver signing enforcement can lead to system instability, unrecoverable printing queues, or degraded print head lifespans. Additionally, if your device is under an active manufacturer warranty or an extended service contract, opening the chassis, breaking warranty seals, or installing unsigned third-party drivers might void your support agreement.
Always consult your IT department or the official vendor documentation if you are operating within a strict compliance framework (such as HIPAA, PCI-DSS, or SOX), as misconfigured network printers can expose internal subnets to unauthorized access or lead to data leakage through unencrypted print streams. Use extreme caution when handling thermal print heads or physical cutter blades, as they can cause burns or lacerations.
Allow the device to cool down completely for at least 15 to 30 minutes after extensive use before attempting any physical clearing of jams, roller maintenance with isopropyl alcohol, or ribbon replacements. Always use a grounded anti-static wrist strap when interacting with internal logic boards to prevent electrostatic discharge (ESD) from permanently damaging sensitive microcontroller units or NVRAM chips.
This comprehensive guide is designed for system administrators, advanced power users, and IT technicians who need to resolve persistent hardware or software issues that standard troubleshooting steps have failed to address. It is provided 'as is' without warranties of any kind.
