


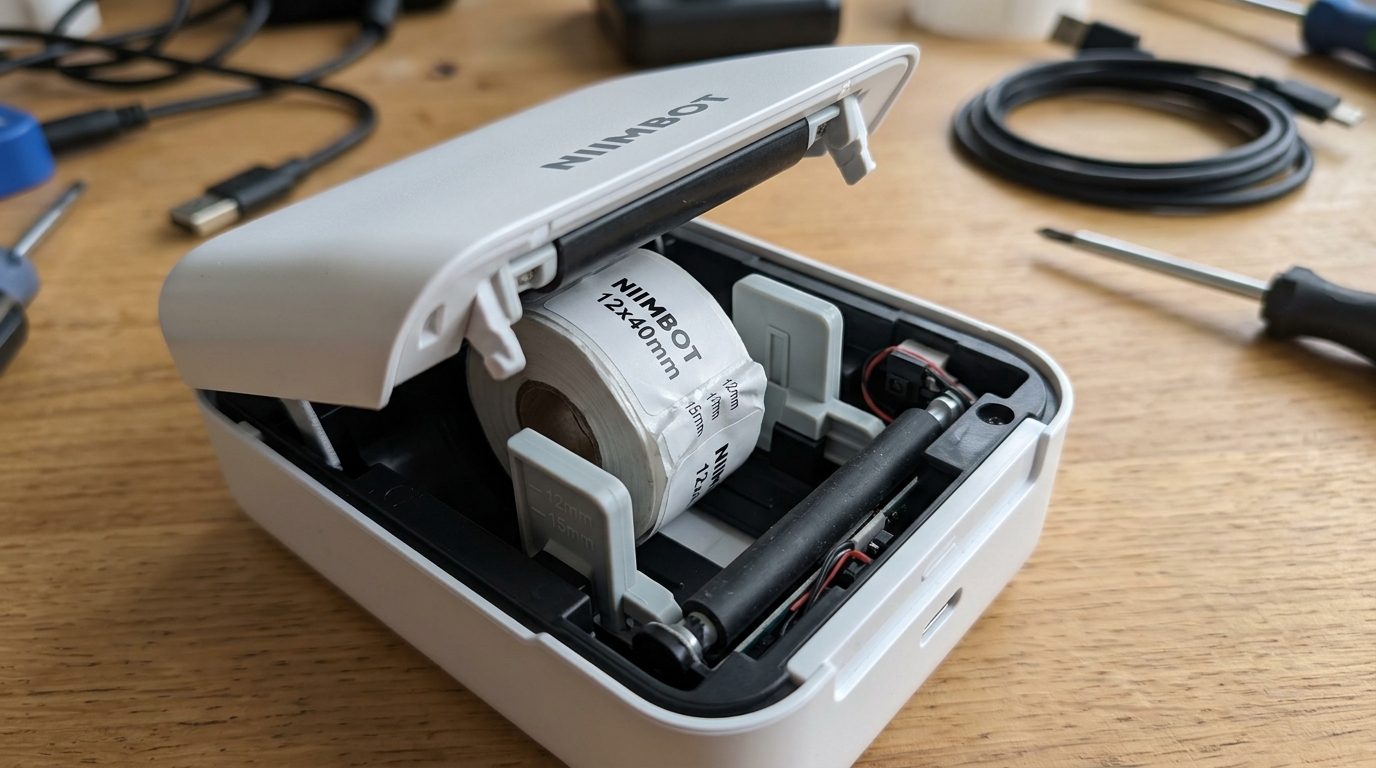
Understanding Niimbot's Precision Paper Handling Mechanisms
Niimbot label printers, such as the popular D11, D110. B21 models, are renowned for their compact design and efficient label creation capabilities.
However, a significant portion of user frustration stems from seemingly simple mechanical operations: loading the paper correctly. Ensuring the device lid closes securely.
These devices utilize a surprisingly intricate internal structure, specifically the paper loading baffle (or paper guide). An optical sensor array, to ensure that each label is perfectly aligned before printing.
The baffle system is designed to maintain precise tension on the label roll, preventing it from unspooling too quickly or skewing sideways during the rapid feed process. When this system is misunderstood or mishandled, it leads to a cascade of errors:
the lid refuses to latch, the printer emits continuous error beeps, or the app reports a 'Paper Empty' or 'Cover Open' status even when a fresh roll is installed.
This comprehensive guide dissects the mechanical and sensor-related aspects of Niimbot's paper loading process, providing detailed solutions to overcome stubborn baffles, realign misfed paper. Resolve sensor false-positives that prevent the lid from closing properly, ensuring your labeling workflow remains uninterrupted.
The precision required for thermal label printing cannot be overstated. Unlike continuous receipt paper, die-cut labels (individual labels on a continuous backing) require the printer to identify the exact beginning and end of each label.
This is achieved through a transmissive or reflective optical sensor located just before the thermal printhead. The paper baffle plays a critical role in guiding the label backing directly over this sensor.
If the paper is loaded sloppily, or if the baffle is not adjusted to the precise width of the roll, the label will wander laterally. The sensor will then fail to detect the gap between the labels, causing the printer to continuously feed paper in a desperate attempt to find the starting position, resulting in wasted labels and a frustrating user experience.
Understanding how the baffle interacts with this sensor is the key to mastering the Niimbot loading process.
Why This Happens: The Mechanics of Baffle Misalignment and Sensor Interference
The inability to close the lid on a Niimbot printer, or encountering persistent feeding errors, is rarely a random glitch; it is almost always the result of a physical misalignment or an obscured sensor. The paper loading baffle is an adjustable plastic guide located inside the paper compartment.
It is spring-loaded or relies on friction to hold its position. Over time, or with forceful handling, the baffle can become jammed on its track or pushed out of alignment.
If the baffle is set too tight, it pinches the label roll, preventing the platen roller from pulling the paper forward. Conversely, if it is too loose, the roll shifts, causing the paper to feed at an angle.
The lid mechanism itself is tightly toleranced. If the paper roll is not seated deeply enough into the compartment, or if the paper is routed over the incorrect internal plastic guides, the physical bulk of the paper prevents the lid's locking tabs from engaging with the chassis.
Applying excessive force to close the lid in this scenario often results in snapping the fragile plastic hinges or locking tabs, permanently damaging the printer.
Beyond physical obstructions, optical sensor interference is a primary culprit for the 'Cover Open' or continuous feeding errors, even when the lid appears closed. The Niimbot relies on a tiny infrared sensor to detect the gaps between labels.
Furthermore, a secondary microswitch or optical sensor detects whether the lid is securely latched. A common issue arises when users utilize non-OEM (Original Equipment Manufacturer) labels.
Niimbot devices frequently utilize an RFID (Radio Frequency Identification) chip embedded in the core of their official label rolls to authenticate the paper. Automatically set the label size in the app.
If a user inserts a non-chipped third-party roll, or if the RFID chip is damaged, the printer may enter an error state, sometimes manifesting as a false 'Cover Open' warning to prevent printing on unrecognized media. Additionally, the optical gap sensor is highly susceptible to contamination.
Paper dust, stray adhesive from peeled labels, or general environmental debris can coat the sensor's lens. When the sensor is blinded, it cannot detect the label gaps, causing the printer to feed continuously until it times out.
Finally, in rare cases, a drop or significant impact can dislodge the internal microswitch responsible for detecting the lid closure, requiring disassembly to realign the switch.
Step-by-Step Fix: Mastering the Loading Process and Resolving Errors
Execute the following detailed steps to correctly configure the paper baffle, ensure proper paper routing. Resolve any sensor-related lid closure issues on your Niimbot device.
- Inspect and Reset the Paper Baffle: Open the printer lid completely. Remove the current paper roll. Examine the adjustable paper baffle (the movable plastic piece on the side of the compartment). Ensure it moves smoothly along its track. If it feels stuck, gently wiggle it back and forth to dislodge any debris. Push the baffle all the way to the widest setting. This ensures maximum clearance when inserting a new roll, preventing the roll from catching on the edges.
- Verify Roll Orientation and Insertion: This is the most critical step. The label roll must be inserted so that the paper feeds from the bottom of the roll, pulling upwards towards the printhead. The printable surface of the labels must face upwards as it passes over the platen roller. Drop the roll into the compartment. It must sit completely flat and deep within the well. If it sits at an angle, the central spindle is not properly engaged with the roll's core.
- Adjust Baffle for Precise Fit: Once the roll is seated, gently slide the adjustable baffle inward until it lightly touches the side of the paper roll. It should secure the roll without pinching it. You should be able to spin the roll freely with your finger. However, the roll should not have any lateral (side-to-side) wobble. An overly tight baffle is a primary cause of paper feed jams.
- Route Paper and Clear Sensors: Pull a small section of the paper out. Ensure it passes underneath any small plastic retaining clips (if present on your specific model) and directly over the rubber platen roller. Locate the small optical sensor window (usually a small rectangular indentation near the printhead). Using a dry, lint-free swab, gently wipe this window to remove any dust or adhesive residue. Pull the paper out so that the first label extends slightly past the cutting edge of the printer.
- Execute the Lid Closure Technique: Do not slam the lid. Bring the lid down gently. Ensure the paper is still aligned between the guides. Press down firmly and evenly on both sides of the lid simultaneously until you hear a distinct, solid "click." If you press only in the center, the locking tabs on the sides may not engage properly, triggering a false 'Cover Open' error via the internal microswitch.
- Perform App Calibration and Print Test: Power on the printer. Open the Niimbot app. If you are using an official RFID-chipped roll, the app should automatically detect the label size. If not, manually select the correct label dimensions. Go to the device settings and tap "Print Test Page" or double-click the physical power button on the printer (depending on model) to trigger a test feed. The printer should feed exactly one label and stop, indicating the sensors and baffles are perfectly aligned.
Advanced Troubleshooting: Addressing Persistent Hardware and RFID Issues
If you have meticulously followed the loading procedure. The printer still refuses to close or continuously feeds paper, the issue requires deeper investigation.
A frequent problem with heavily used Niimbot B21 models involves the degradation of the lid latching mechanism. The small plastic hooks on the lid engage with metal or plastic receptacles within the chassis.
Over time, plastic fatigue or wear can cause these hooks to lose their sharp edge. When you attempt to close the lid, the hooks slip out of the receptacles instead of locking.
Inspect these hooks under a bright light. If they appear rounded or broken, the lid assembly requires replacement.
Attempting to force the lid closed or taping it shut will only misalign the printhead, resulting in poor print quality and eventual permanent failure.
The integration of RFID technology in Niimbot rolls introduces a complex layer of potential failure. The printer contains an RFID reader antenna located within the paper compartment.
If you are using a genuine Niimbot roll. However, the app fails to recognize the paper or throws an error, the RFID chip within the roll's cardboard core may be defective, or the printer's internal antenna may be damaged.
To isolate this, attempt to load a different, brand-new official Niimbot roll. If the new roll is recognized instantly, the previous roll had a faulty chip.
If multiple official rolls fail to be recognized, the printer's internal RFID reader is likely compromised, requiring warranty repair. It's important to note that attempting to bypass the RFID system by placing an old, chipped core next to a new, non-chipped roll often fails, as the printer tracks the length of paper consumed via the chip.
Will eventually reject the 'empty' chip even if there is physical paper remaining.
Furthermore, persistent 'Cover Open' errors on a physically closed. Latched printer point directly to a failure of the internal microswitch.
This switch is a small, mechanical component that is physically depressed when the lid locking mechanism engages. Dust accumulation, moisture, or simple mechanical failure can cause this switch to stick in the 'open' position.
Diagnosing this requires technical expertise, as it involves partially disassembling the printer chassis to access the motherboard. Test the switch for continuity using a multimeter.
If the switch fails the continuity test, it must be desoldered and replaced. For most users, this level of repair is impractical.
Contacting Niimbot support for a replacement is the most viable option.
Finally, consider the firmware (internal software). Occasionally, a firmware (internal software) bug can cause the printer's logic board to misinterpret sensor data, leading to erratic feeding behavior or false error states.
Always ensure your printer is running the latest firmware (internal software) version available through the Niimbot app. If the printer enters a continuous feed loop immediately upon powering on.
No sensor obstruction is found, attempting a hard reset (consulting your manual for the specific button combination, often holding power for 10-15 seconds) or updating the firmware (internal software) can sometimes resolve these deep-seated logic errors.
Frequently Asked Questions (FAQ)
Why does the printer feed 3 or 4 blank labels before stopping?
This is a classic symptom of the optical sensor failing to detect the label gaps correctly. It usually means the paper is loaded crookedly, the adjustable baffle is too loose, or the sensor window is dirty.
Can I use any brand of thermal labels in my Niimbot if they are the correct size?
It depends on the model and firmware (internal software) version. Many modern Niimbot models use RFID technology to lock the user into their built-in ecosystem.
The lid clicks shut, but the app still says "Cover is open." What should I do?
This indicates a failure of the internal microswitch that detects the lid closure. Try firmly pressing down on both corners of the lid simultaneously to ensure both locking tabs are fully engaged.
My labels are printing off-center, drifting to the left or right. How do I fix this?
Off-center printing is caused by the adjustable paper baffle being set incorrectly. The baffle must be pushed snugly against the side of the paper roll to keep it perfectly centered as it feeds over the platen roller.
