


Definitive Guide: Fixing Pantum "Toner Not Recognized" Errors, Chip Resets, and Spring Contacts
Pantum laser printers offer an incredibly cost-effective entry point into home and small office printing. However, their aggressive digital rights management (DRM) and specific hardware design often lead to a common and frustrating error: "Toner Not Recognized," "Replace Toner," or flashing orange error lights, even when a brand new cartridge has been installed.
This comprehensive guide will dissect the technical mechanisms Pantum uses to verify cartridges, explain why these verification systems fail, and provide step-by-step methods to resolve chip recognition issues, clean internal contacts, and override artificial software blocks.
The core of the issue lies in the microchip embedded on every Pantum toner cartridge. This small PCB (Printed Circuit Board) communicates with the printer's logic board via an I2C or similar serial interface.
It transmits a unique serial number, cartridge region data, and an encrypted counter that estimates the remaining toner based on page coverage and drum rotations. When the printer cannot read this chip, or if the chip's internal counter has reached zero, the logic board immediately halts the printing process, regardless of how much physical toner powder remains in the hopper.
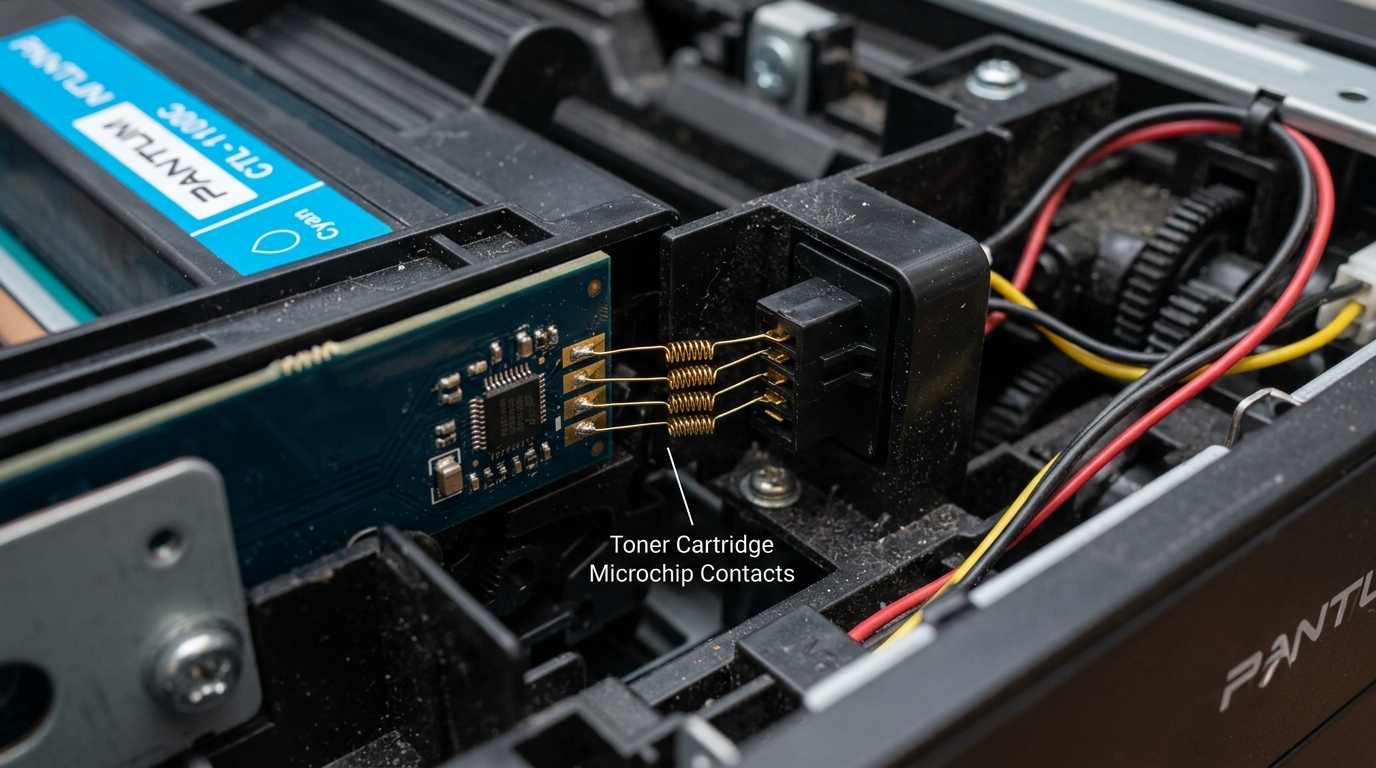
Compounding the chip issue is the physical design of the electrical interface inside the printer. Pantum machines utilize thin, spring-loaded wire contacts to bridge the connection between the logic board and the cartridge chip.
These springs are highly susceptible to deformation, oxidation, and contamination from stray toner powder. Understanding the interplay between the digital chip lockouts and the physical electrical contacts is crucial for successfully troubleshooting and maintaining your Pantum printer.
Why This Happens: The Mechanics of Toner Rejection
The "Toner Not Recognized" error is rarely a simple glitch; it is usually the result of a specific physical or logical failure in the handshake process between the printer and the cartridge. We can categorize these failures into three main areas: Electrical Continuity Failure, Regional/Firmware Lockout, and Chip Counter Depletion.
Electrical Continuity Failure (The Spring Contacts): Inside the printer cavity, usually on the left or right side wall, you will find small metal contacts (often thin wire springs) that align with the gold pads on the toner chip. Every time you insert a cartridge, these springs scrape against the chip pads to establish an electrical connection.
Over time, physical wear, rough handling during cartridge installation, or paper jams can bend these springs out of alignment. Furthermore, laser printers are inherently dusty environments; microscopic toner particles (which are plastic polymers) can coat the contacts, acting as a powerful insulator and breaking the data connection.
Regional and Firmware Lockouts: Pantum enforces strict regional coding on their cartridges. A printer purchased in North America will reject a perfectly good, genuine Pantum cartridge intended for the European or Asian market.
The chip contains a region code that must match the printer's firmware. Additionally, Pantum frequently pushes background firmware updates via Wi-Fi or the host computer software.
These updates are primarily designed to add new encryption keys to block third-party (compatible or remanufactured) toner cartridges. If you install an aftermarket toner and suddenly receive an error after a software update, the firmware has locked out the non-genuine chip.
Chip Counter Depletion and "Starter" Cartridges: Pantum printers ship with a "starter" cartridge that has a very low page yield chip (often 500-700 pages). The printer calculates toner usage algorithmically; it does not have a physical sensor inside the toner hopper.
Once the chip's counter reaches zero, it writes a permanent "empty" flag to the chip's EEPROM. Even if you physically refill the cartridge with toner powder, the printer reads the "empty" flag and refuses to print.
You must replace the chip or use an "endless" reset chip if your model supports it.
It's also worth noting the distinction between the toner cartridge (which holds the powder) and the drum unit (which transfers the image). In some Pantum models (like the P3000 series), these are separate components, each with its own chip.
An error indicating a supply issue might actually be pointing to an expired drum chip rather than the toner chip.
Step-by-Step Fix: Resolving Chip and Contact Issues
- Physical Inspection and Cleaning of the Gold Chip: Remove the toner cartridge from the printer. Locate the small green PCB with gold contacts on the side of the cartridge. Inspect it for scratches, toner dust, or adhesive residue (often left behind if you removed a protective sticker). Take a clean pencil eraser and gently rub the gold contacts to remove any invisible oxidation. Follow up by wiping the chip with a lint-free cloth lightly dampened with 99% isopropyl alcohol. Allow it to dry completely.
- Re-aligning and Cleaning the Printer Spring Contacts: Shine a bright flashlight into the printer cavity where the cartridge chip aligns. You will see 2 to 4 small metal contacts (pins or wire springs). If they are coated in black toner dust, use a cotton swab lightly moistened with isopropyl alcohol to carefully clean them. Crucial Step: Inspect the alignment of the springs. If one is pushed in further than the others or bent sideways, use a small, non-conductive tool (like a plastic spudger or a wooden toothpick) to gently pry it back into its normal, protruding position. Do not use excessive force, or they will snap.
- The "Hard Reset" and Initialization Cycle: Sometimes the printer's logic board gets stuck in an error loop. Turn the printer off. Unplug the power cord and the USB cable. Press and hold the power button for 30 seconds to drain all residual capacitance from the logic board. Plug the power cord back in, power the printer on, and wait for it to fully initialize (the motor will spin up and stop). Only then, open the lid and insert the toner cartridge firmly until it clicks. Closing the lid triggers the chip read cycle.
- Firmware Downgrade (For Aftermarket Cartridge Users): If your third-party toner worked yesterday but fails today, an automatic firmware update likely blocked it. You must disable automatic updates in the Pantum software on your PC. To fix the current issue, search online forums for an older firmware version for your specific printer model. The downgrade process usually involves connecting via USB and running a specific flashing utility provided by the aftermarket toner community. Note: Flashing firmware carries a risk of bricking the device.
- Installing a Replacement or "Auto-Reset" Chip: If you are refilling your own cartridges, cleaning the contacts will not work if the original chip has registered as empty. You must purchase a replacement chip specific to your Pantum model and region. Carefully pry the old chip out of its plastic retaining slot on the cartridge and slide the new one in, ensuring the gold contacts face outward. Some vendors sell "auto-reset" chips that reset their counter every time the printer is power-cycled, allowing for unlimited refills.
- Check the Drum Unit Chip (Separated Supply Models): If you have cleaned the toner chip and verified it is new, but the error persists, check the drum unit. Remove the toner, then remove the drum unit beneath it. Clean the chip on the drum unit and the corresponding contacts inside the printer using the same methods described above. An expired drum chip will halt printing just like an empty toner.
Advanced Troubleshooting: Logic Board and Sensor Bypass
If you have installed a genuine, brand-new Pantum cartridge, meticulously cleaned and aligned the spring contacts, and performed a hard reset, but the printer still refuses to recognize the toner, you are dealing with a severe hardware failure, likely on the High Voltage Power Supply (HVPS) or the Main Logic Board.
The circuit that reads the chip operates on a low-voltage data rail (usually 3.3V). Using a multimeter, a skilled technician can measure the voltage on the printer's spring contacts when the printer is powered on but the cartridge is removed.
Two of the pins provide power and ground to the chip, while the others are for data (SDA/SCL). If there is no voltage on the power pins, a trace on the logic board is burnt, or a surface mount resistor has failed, meaning the printer cannot power the chip to read it.
This requires replacing the main board.
In some older Pantum models, technicians have discovered hardware bypasses. These involve soldering a permanent auto-reset chip directly to the logic board's data lines, bypassing the physical spring contacts entirely.
This ensures a perfect data connection at all times and permanently defeats the toner DRM, allowing the use of any refilled cartridge. This is a complex procedure requiring microscopic soldering skills and an exact pinout schematic of your specific printer model's logic board.
FAQ
Why does the printer say empty when I can feel there is still toner inside?
Pantum printers do not weigh the cartridge or use optical sensors to check the actual powder level. They estimate usage by counting the number of pages printed and the amount of page coverage.
Can I just tape over the chip to make the printer ignore it?
No. Taping over the chip breaks the electrical connection.
My replacement chip looks slightly different than the original. Will it work?
Aftermarket replacement chips often use different PCB layouts or components than genuine Pantum chips to avoid patent infringement, but they are programmed to emulate the exact data protocol. As long as the physical dimensions fit in the cartridge slot and the gold contact pads align with the printer's springs, it should function correctly (assuming the firmware hasn't blocked it).
How can I prevent firmware updates from blocking my cheap toner?
You must prevent the printer from communicating with Pantum's servers. If using USB, open the Pantum utility software on your computer and uncheck "Automatically check for updates." If the printer is on your Wi-Fi network, log into your router's administration panel and block the printer's IP or MAC address from accessing the external internet, allowing it only to communicate on your local network.
