


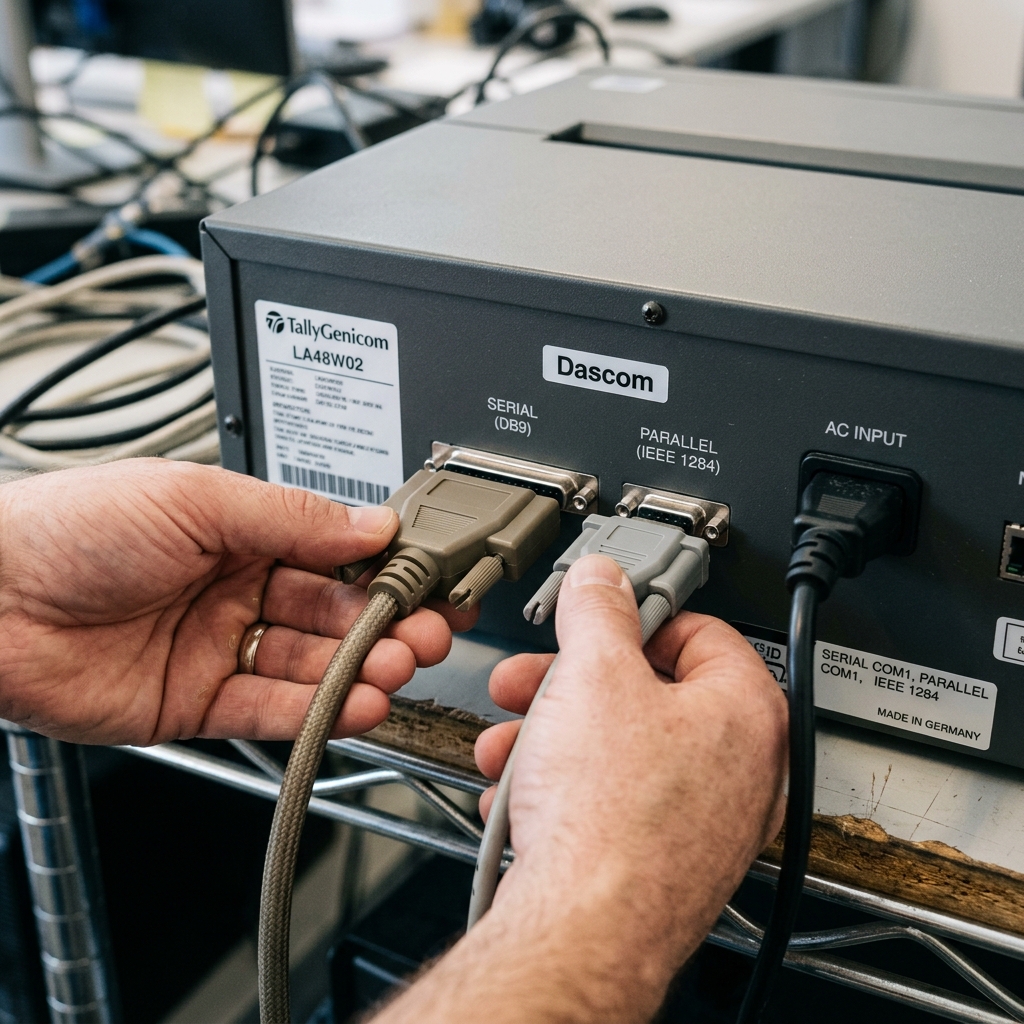
Introduction to Dascom Printer Port Setup
Setting up legacy communication interfaces such as serial and parallel ports on Dascom printers is a crucial task for businesses relying on older infrastructure, industrial equipment, or specialized point-of-sale (POS) systems. While USB and Ethernet have largely become the standard for modern printing, many Dascom dot matrix and thermal printers continue to offer serial (RS-232) and parallel (IEEE 1284) interfaces to ensure backward compatibility with legacy mainframes, manufacturing execution systems, and proprietary software applications.
Understanding how to properly configure these ports is essential to ensure reliable data transmission, prevent character corruption, and maintain the steady flow of business operations. In this comprehensive guide, we will dive deep into the technical nuances of configuring serial and parallel ports on your Dascom printer, exploring baud rates, parity, handshaking protocols, and the physical connections required to achieve a stable link between your host system and the printer.
Unlike plug-and-play USB interfaces, serial and parallel connections require strict alignment of communication parameters between the sender (host system) and the receiver (printer). A single mismatch in baud rate or data bits can result in pages of garbled text or a complete failure to print.
Furthermore, the physical cables themselves play a significant role in the success of the setup. Parallel cables must meet the IEEE 1284 standard for bidirectional communication, while serial cables must have the correct pinout, often requiring null modem configurations depending on the host's serial port.
By mastering the setup process outlined in this guide, IT administrators and technicians can seamlessly integrate Dascom printers into complex legacy environments, ensuring decades of reliable service from these robust printing machines.
Why This Happens: The Mechanics of Serial and Parallel Communication
The challenges associated with serial and parallel port setups stem from the fundamental differences in how these older interfaces transmit data compared to modern protocols. Serial communication (RS-232) transmits data sequentially, one bit at a time, over a single communication channel or wire.
Because there is no shared clock signal between the host and the printer, both devices must be pre-configured to send and receive data at the exact same speed, known as the baud rate. Additionally, they must agree on the format of each data packet, which includes the number of data bits (usually 7 or 8), the type of parity bit used for basic error checking (none, odd, or even), and the number of stop bits (1 or 2) that signal the end of a character.
If the host sends data at 9600 baud but the printer is expecting 19200 baud, the printer will misinterpret the incoming bits, resulting in the classic "garbage print" scenario where random symbols and characters are printed endlessly.
Parallel communication (IEEE 1284), on the other hand, transmits multiple bits of data simultaneously across multiple wires within the cable. This historically provided faster data transfer rates than serial connections.
The parallel interface relies on hardware handshaking signals, such as Strobe, Busy, and Acknowledge, to coordinate the flow of data. When the host sends a byte of data, it pulses the Strobe line.
The printer reads the data and asserts the Busy line while processing it. Once ready for the next byte, the printer drops the Busy line and pulses the Acknowledge line.
Issues with parallel setup often arise from using substandard cables that lack proper shielding, leading to crosstalk between the parallel wires, or from mismatched port modes in the host system's BIOS (e.g., SPP, EPP, ECP). Understanding these underlying mechanics is crucial for diagnosing communication failures and configuring the ports correctly.
Step-by-Step Fix: Configuring Your Dascom Printer Ports
Follow these detailed steps to successfully configure the serial or parallel port on your Dascom printer. These instructions apply generally to most Dascom dot matrix models, though specific menu layouts may vary slightly.
- Access the Printer's Setup Menu: Turn on the printer while holding down the appropriate button combination (often 'Setup' or 'Menu') to enter the configuration mode. The printer will typically print out a menu map or display options on the LCD screen if equipped.
- Navigate to the Interface Settings: Use the directional buttons on the printer's control panel to navigate through the main menu until you find the 'Interface' or 'I/O' submenu. Select this option to access port-specific settings.
- Select the Active Port: Ensure that the printer is configured to listen on the correct port. If the setting is on 'Auto', it may not reliably switch to serial or parallel if a USB cable was previously used. Force the interface to either 'Serial' or 'Parallel' depending on your connection.
- Configure Serial Parameters (If using RS-232): If you are setting up the serial port, you must configure the following parameters to match your host system:
- Baud Rate: Common values are 9600, 19200, 38400, or 115200. Check your host software requirements.
- Data Bits: Usually set to 8.
- Parity: Usually set to None.
- Stop Bits: Usually set to 1.
- Protocol/Handshaking: Select either XON/XOFF (software flow control) or DTR/DSR (hardware flow control). Hardware flow control is generally recommended for faster baud rates to prevent buffer overruns.
- Configure Parallel Parameters (If using IEEE 1284): If setting up the parallel port, ensure the 'Bi-directional' setting is enabled if your host requires status feedback from the printer. Some legacy systems may require it to be disabled (unidirectional mode).
- Save Settings and Restart: Once all parameters are configured, navigate to the 'Save and Exit' option in the menu. The printer will save the configuration to its NVRAM and restart.
- Configure the Host System: On your host computer or terminal, access the device manager or communication software settings. Verify that the COM port or LPT port settings exactly mirror the settings you just applied to the printer.
- Perform a Test Print: Send a simple text string or a test page from the host system to the printer. If the setup is correct, the text will print clearly. If you receive garbage characters, immediately turn off the printer to stop the print job, and re-verify the baud rate and data bit settings on both ends.
- Secure the Connections: Finally, ensure the serial or parallel cable is securely fastened using the thumbscrews on the connectors. Loose connections can cause intermittent data loss and printing errors.
- Document the Configuration: Print out the printer's current configuration page and store it in a safe place. This will serve as a valuable reference if the settings are ever accidentally changed or if the printer needs to be replaced in the future.
Advanced Troubleshooting: Diagnosing Stubborn Connection Issues
If you have followed the step-by-step guide and are still experiencing communication problems, more advanced troubleshooting is required. One of the most common issues with serial connections is the pinout of the serial cable.
There are two main types of serial cables: straight-through and null modem (crossover). Depending on whether the host system acts as DTE (Data Terminal Equipment) or DCE (Data Circuit-terminating Equipment), you may need a null modem adapter to swap the transmit (TX) and receive (RX) lines.
Using a breakout box or a digital multimeter to check the voltage on pins 2 and 3 of the serial port can help determine the correct cable configuration. The TX line should have a negative voltage (typically -3V to -15V) when idle.
For parallel connections, issues often stem from the host computer's BIOS settings. Modern PCs with legacy parallel ports added via PCI cards or integrated onto the motherboard may default to ECP (Extended Capabilities Port) or EPP (Enhanced Parallel Port) modes.
While these modes offer advanced features and speed, some older printers or legacy software may only function correctly in standard SPP (Standard Parallel Port) or 'Normal' mode. Access the host computer's BIOS during startup and look for the parallel port configuration section to test different modes.
Additionally, ensure the parallel cable length does not exceed 10 feet (3 meters), as longer cables can introduce signal degradation and timing errors, leading to incomplete or garbled print jobs.
FAQ: Common Questions About Dascom Port Setup
Why is my Dascom printer printing endless pages of random characters?
This is the classic symptom of a baud rate or framing error on a serial connection. The printer is receiving data, but because the speed (baud rate) or data format (data bits, parity) settings on the printer do not match the settings on the host computer, the printer misinterprets the data as random ASCII characters.
Do I need a special serial cable for my Dascom printer?
It depends on your host system. Dascom printers generally act as DTE (Data Terminal Equipment).
My parallel connection works, but the printer sometimes drops characters. Why?
Dropped characters on a parallel connection usually point to a handshaking issue or cable degradation. Ensure the cable is firmly attached and is an IEEE 1284 compliant cable, which has superior shielding against interference.
Can I use a USB to Serial adapter with my Dascom printer?
Yes, USB to Serial (RS-232) adapters are commonly used to connect legacy serial printers to modern computers lacking physical COM ports. However, it is crucial to use a high-quality adapter with a reliable chipset, such as those made by FTDI or Prolific.
How do I reset the interface settings back to factory defaults?
If you've lost track of the settings and need to start fresh, you can usually reset the printer to factory defaults via the setup menu. The exact procedure varies by model, but it often involves navigating to a 'Maintenance' or 'Admin' submenu and selecting 'Load Defaults' or 'Factory Reset'.
