


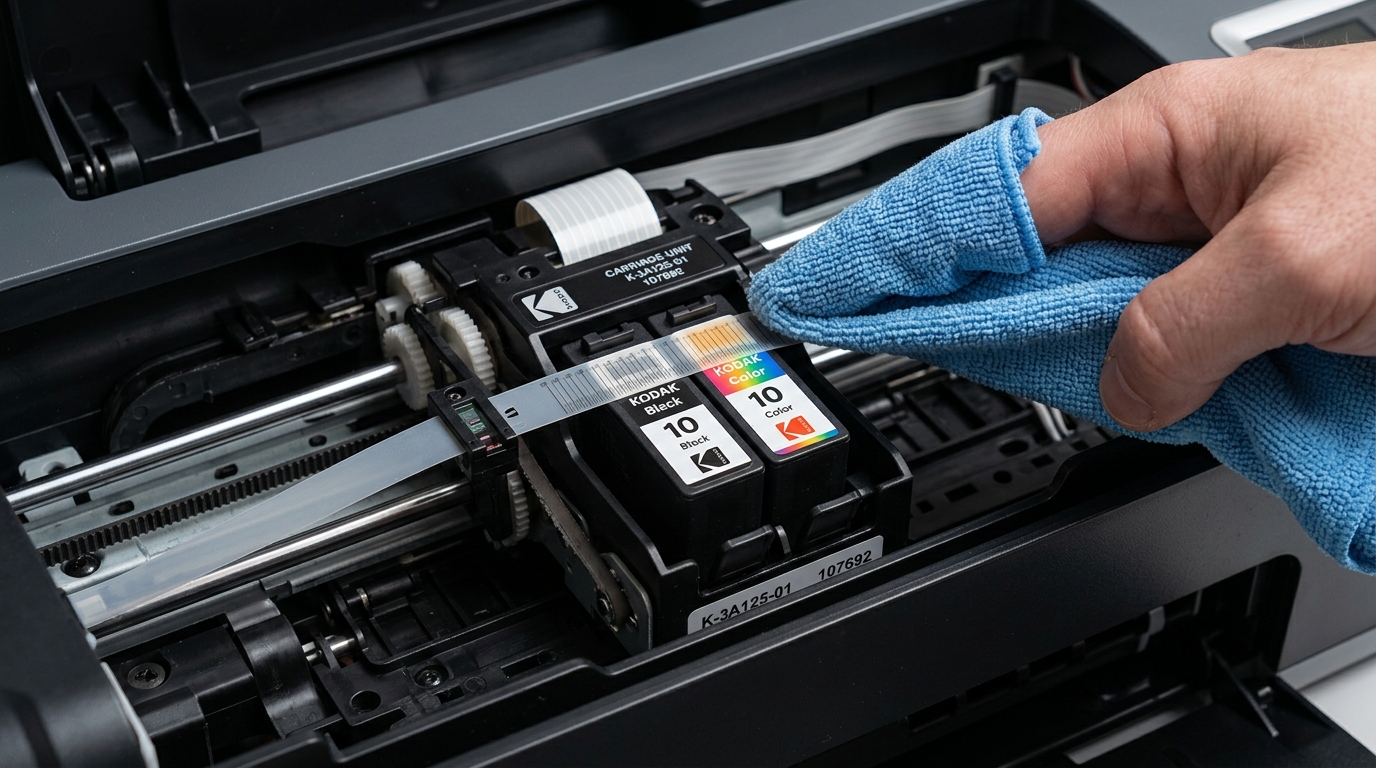
If your Kodak printer is producing double text shadows, jagged vertical lines, or making a loud grinding or slamming noise as the print carriage hits the side walls, the culprit is almost certainly a dirty **encoder strip**.
The encoder strip is a thin, transparent plastic band that runs horizontally across the width of the printer, directly behind the metal carriage rail.
It contains thousands of microscopic vertical hash marks that an optical sensor on the back of the carriage reads to track its exact position. If ink mist, dust, or grease covers these marks, the printer loses tracking, resulting in print errors.
Wiping this strip clean is a delicate process.
Safety Warning: The Fragility of the Timing Marks
The hash marks on the encoder strip are printed with water-soluble ink. If you clean the strip with rubbing alcohol, window cleaner, or heavy water, you will **wash away the timing marks**, turning the strip completely clear.
Once the marks are gone, the printer will be permanently broken, as the carriage will slam violently into the side frames. Wiping should only be done dry or with a barely damp cloth.
Step 1: Locate and Inspect the Encoder Strip
- Turn the printer on and open the main access cover.
- Wait for the printhead carriage to move to the center.
- With the printer still powered on, **pull the power cord out of the back**. This unlocks the carriage, allowing you to slide it manually.
- Look behind the carriage and slightly above the metal guide rail. You will see a thin, semi-transparent plastic strip about 1/4 inch tall.
- Examine the strip with a flashlight. Look for dark ink splatters, grease streaks (transferred from the metal rail), or dust clumps.
Step 2: Fabric Selection and Safety Rules
| Recommended Cleaning Tool | Why It is Used | Tools to Avoid |
|---|---|---|
| Dry Microfiber Cloth | Picks up dust and grease without scratching. | Paper Towels (Scratches plastic and leaves lint fibers behind) |
| Barely Damp Cloth (Distilled Water) | Only for stubborn dried ink drops. | Isopropyl Alcohol (Dissolves timing marks instantly) |
| Finger Grip Pinch | Allows gentle pressure control. | Tweezers or Pliers (Punctures or tears the plastic strip) |
Step 3: Wiping Technique (Avoid Spring Dislodges)
The encoder strip is held under tension by a small metal spring on the left side. If you pull too hard, the strip will detach from the spring, which is extremely difficult to reattach.
- Manually slide the printhead carriage all the way to the far right.
- Wrap a dry microfiber cloth tightly around your thumb and index finger.
- Pinch the encoder strip gently between your fingers.
- Wipe the strip from the **left side toward the center**. Keep your stroke light and steady. Avoid pulling or twisting the strip toward you.
- Slide the printhead carriage all the way to the far left.
- Pinch the strip again and wipe from the **right side toward the center**. Wiping from the outer edges toward the center ensures you do not put excessive tension on the left spring.
- Inspect the strip with your flashlight. If grease remains, dampen the cloth *very slightly* with a single drop of distilled water, wipe, and dry immediately.
Step 4: Re-aligning the Carriage and Testing
- Gently slide the carriage back to the center of the rail.
- Close the printer access cover.
- Plug the power cord back into the printer and turn it on.
- The carriage will perform a startup initialization. If it glides smoothly back and forth and parks quietly on the right, the encoder strip reading is successful.
- Print a alignment page to calibrate tracking.
Related Kodak Troubleshooting Guides
The Vital Function of the Kodak Linear Encoder Strip
Suspended horizontally across the entire width of the printhead carriage path is a 5mm-tall flexible optical timing strip (the Linear Encoder Strip). This transparent strip is etched with thousands of microscopic vertical hash marks that an optical photodiode sensor on the back of the carriage reads to calculate printhead speed, acceleration, and dot placement.
If ink mist, aerosolized grease, or paper dust obscures these hash marks, the printer loses horizontal tracking, resulting in printhead carriage collisions, grinding noises, text ghosting, or fatal carriage jam errors.
Step-by-Step Safe Cleaning Procedure
- Power Off and Unplug the Printer:
Safety is paramount. Unplug the AC power cord from the wall. Lift the top printer lid to access the carriage chamber.
- Locate the Clear Strip:
Look directly above the silver steel carriage guide rod. You will see the thin, clear plastic ribbon suspended between two metal tension brackets on the far left and far right walls of the chassis.
- The Two-Finger Microfiber Wipe:
- Take a lint-free optical microfiber cloth or lens wipe.
- Moisten the cloth slightly with warm distilled water .
- CRITICAL WARNING: Never use isopropyl alcohol, acetone, ammonia, or glass cleaner. Chemical solvents will instantly dissolve the microscopic printed emulsion lines, permanently destroying the encoder strip.
- Gently pinch the strip between your thumb and forefinger with the damp cloth.
- Slide your fingers smoothly from left to right along the strip. You will see black ink mist and amber grease transfer onto the cloth.
- Repeat with a dry section of the microfiber cloth to remove all moisture.
- Clean the Optical Sensor Eye:
Behind the printhead carriage is a small black plastic bracket holding the optical sensor reader. Use a gentle puff of dry compressed air to clear any loose dust fibers lodged inside the sensor slot.
- Inspect Mounting Springs:
Verify that the strip has not detached from the tension spring on the left chassis wall. The strip should be taut and level across the entire print width.
Frequently Asked Questions
What happens if the encoder strip unhooks during cleaning?
If the strip pops off its mount, use needle-nose tweezers to hook the rectangular slot on the left end back onto the metal spring, feed the strip through the optical sensor slot on the carriage, and latch the right end onto the fixed post.
How often should I clean the encoder strip?
For regular household use, cleaning the encoder strip once every 12 to 18 months (or whenever double text lines appear) is sufficient to maintain pinpoint print registration.
