


Reading the Diagnostic Heartbeat
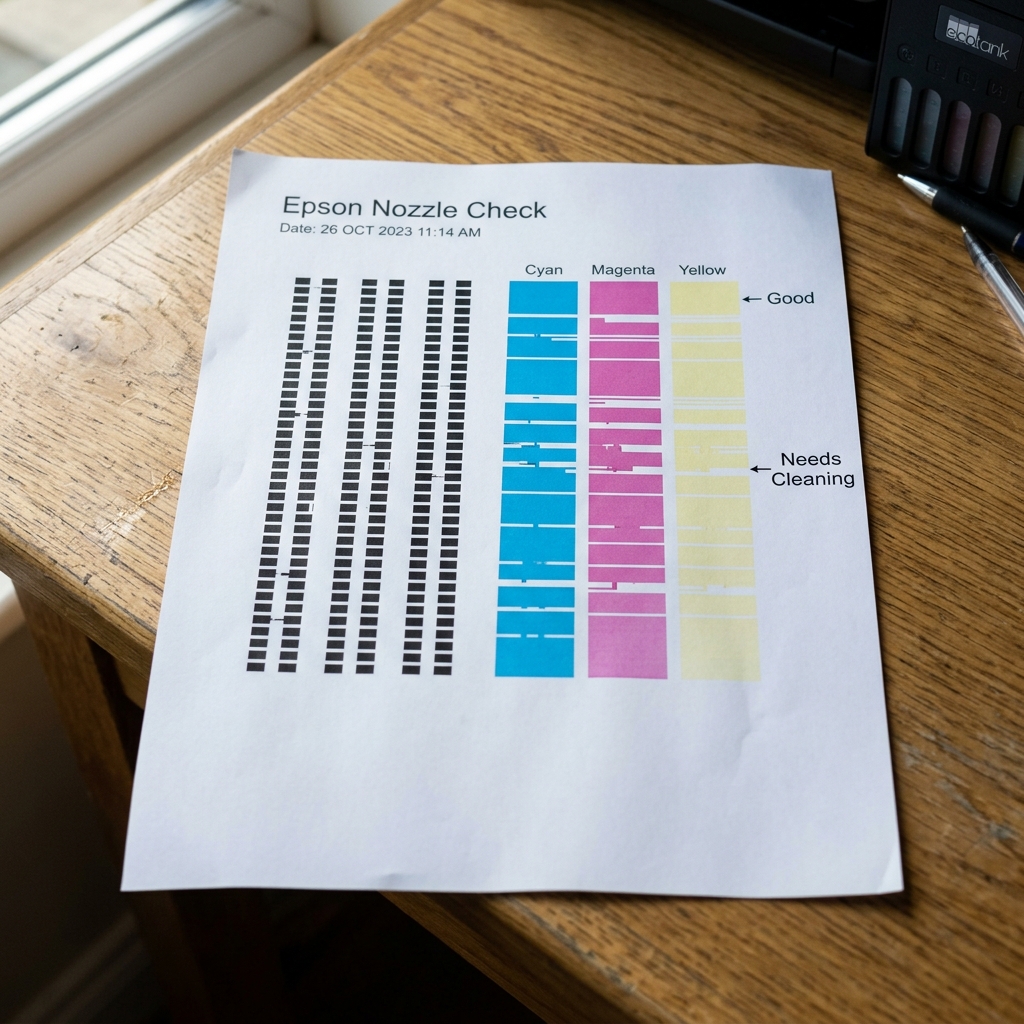
The Epson Nozzle Check Pattern is the single most important diagnostic tool you have. By printing a staggered, stair-step grid of lines for every color, the printer shows you the exact health of its microscopic printhead nozzles.
A perfect pattern looks like a solid, unbroken staircase. A failed pattern has missing rungs, gaps, or blurry, sideways-spraying lines. How you fix it depends entirely on how the pattern failed.
Scenario 1: The Static Gap (The Hard Clog)
You print a nozzle check. The Cyan grid is missing three lines in the middle. You run a Head Cleaning and print it again. The exact same three lines are still missing.
The Cause: This is a hard clog. The ink has dried and crystallized inside those three specific microscopic nozzles. The standard suction pump is not strong enough to break the crust.
The Fix: Stop running head cleanings; you are just wasting ink. The fresh, wet ink that was pulled down during the first cleaning is now sitting on top of the hard clog.
Turn the printer off and walk away for 12 to 24 hours. The chemicals in the wet ink will slowly dissolve the crystallized clog overnight.
Run one more cleaning the next morning, and the gaps will likely vanish.
Scenario 2: The Moving Gap (Air Bubbles)
You print a nozzle check. The Magenta grid is missing the top two lines. You run a Head Cleaning and print it again. Now the top lines are back, but three lines at the bottom of the grid are missing.
The Cause: This is NOT a clog. This is micro-foam or air bubbles trapped inside the printhead channel. As you run cleanings, the suction drags the air bubbles around inside the printhead, temporarily blocking different nozzles.
The Fix: Again, stop cleaning. Running more cleanings violently churns the ink, creating more micro-foam (like shaking a soda can). Let the printer sit idle for a few hours. The microscopic air bubbles will naturally rise to the top of the damper and dissipate. The lines will restore themselves.
Scenario 3: Wavy or Blurry Gaps (Deflection)
You print a nozzle check. No lines are missing, but several lines are fuzzy, wavy, or printing diagonally across the gaps.
The Cause: This is Nozzle Deflection. A nozzle is partially blocked by a speck of dust or semi-dried ink. The ink droplet is forced out at a sideways angle, like putting your thumb over a garden hose.
The Fix: A standard head cleaning usually clears this. If it is persistent, soak a paper towel in Windex, place it under the printhead carriage, and let it sit overnight. The ammonia will dissolve the stubborn rim of dried ink causing the deflection.
How to Interpret an Epson Micro Piezo Nozzle Check Pattern
Unlike thermal inkjets that boil ink, Epson printers use Micro Piezo Technology. Microscopic piezoelectric crystals flex when energized, mechanically ejecting ink droplets.
When a Nozzle Check Pattern exhibits missing segments or staggered gaps, dried ink crystals are blocking the physical nozzle plate holes, or air pockets are trapped inside the printhead chamber.
Diagnostic Pattern Analysis & Recovery Protocol
- Analyzing the Staircase Grid Pattern:
The printed sheet displays a series of stepped horizontal and diagonal lines for each color (Black, Cyan, Magenta, Yellow):
- Solid, unbroken staircase: The printhead is 100% healthy.
- 1-2 missing horizontal lines: Minor dried surface ink. Run a single standard Head Cleaning cycle.
- Entire color band missing (e.g., all Cyan missing): The damper has air-locked or lost prime. A Power Cleaning or manual syringe damper prime is required.
- Deflected / Crooked lines: Dried ink partially obstructs the nozzle rim, causing the ink droplet to fire at an angle. Requires soaking the nozzle plate in printhead cleaning solution.
- The "2-Cycle & 2-Hour Rest" Rule:
Never run more than 2 consecutive cleaning cycles. Running 5+ cleanings in a row overheats the piezo crystals and whips the liquid ink into a frothy foam of micro-bubbles, making the gaps worse.
Run 2 cleaning cycles, then let the printer sit idle for 2 to 4 hours to allow micro-bubbles to settle.
- The Warm Paper Towel Printhead Park Soak:
Fold a paper towel to the width of the carriage. Moisten it with warm distilled water or dedicated printhead cleaning solution.
Unplug the printer when the carriage moves to the center. Place the wet towel across the platen and gently slide the carriage directly over the wet towel.
Let it sit for 1 hour to soften stubborn crusts on the nozzle face.
Frequently Asked Questions
Why do different gaps appear in different places after every cleaning cycle?
If missing lines move randomly from one nozzle to another after each cleaning, you have air bubbles circulating inside the printhead manifold, not a permanent clog. Let the printer rest for 6 hours without cleaning to allow the air to rise and escape.
Can low-quality sublimation ink permanently clog an Epson printhead?
Yes. Sublimation inks contain large dye particles.
