


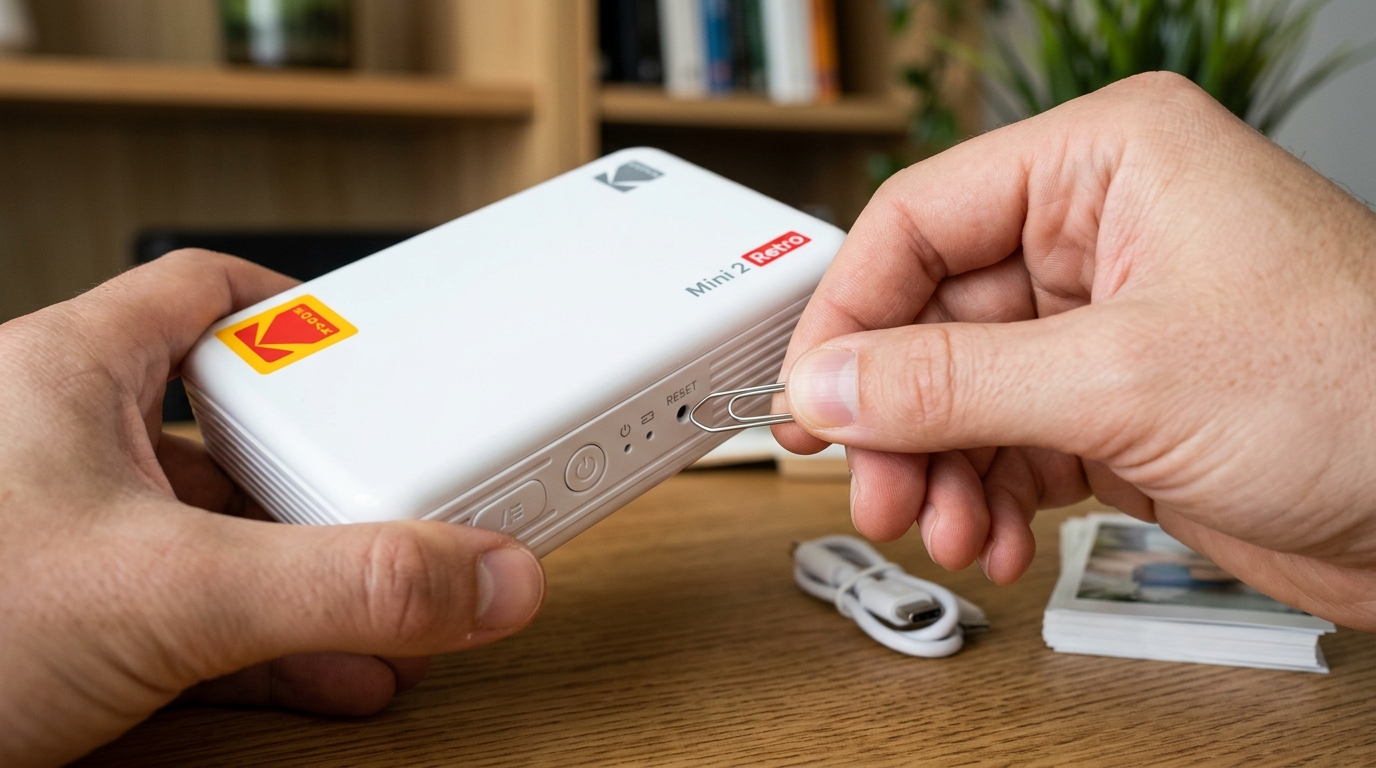
The Kodak Mini 2 Retro and Mini 3 Retro are highly popular portable photo printers that utilize 4PASS dye-sublimation technology. Unlike inkjets, these printers use a single integrated cartridge containing both the color film ribbons and 10 sheets of photo paper.
Because the paper must enter and exit the printer four times during a single print job, any power interruption, low battery state, or paper alignment slip can cause the internal gears to lock. This leaves the cartridge stuck in the side bay.
Let's walk through the safe extraction and recovery process.
Understanding the Lockout Causes
Before trying to pull the cartridge out, it is crucial to understand that the printer has active locking gears. Forcefully yanking the cartridge out will strip the internal plastic gears, permanently breaking the printer. The cartridge locks up because:
- Ribbon Wrap: The yellow, magenta, or cyan film ribbon has melted or adhered to the rubber rollers.
- Cycle Freeze: The battery level dropped below 20% mid-print, causing the firmware to freeze before returning the feed gears to the park position.
- Double-Feed: Two photo sheets entered the rollers simultaneously, blocking the carriage.
Step 1: The Pinhole Gear Cycle Reset
If the cartridge is stuck because of a cycle freeze, triggering a hardware reset will force the printer to initialize its gears and retract the locking pins.
- Ensure the micro-USB charging cable is disconnected.
- Locate the tiny **Reset pinhole** on the side of the printer (near the power button and charging port).
- Straighten a paperclip and press it into the pinhole until you feel the micro-switch click. Hold it for **3 seconds**.
- Press the **Power** button to turn the printer back on. You should hear the internal motors and gears spinning for a few seconds. This is the initialization cycle.
- Try opening the cartridge door and sliding the cartridge out. It should slide out smoothly without resistance.
Step 2: Winding the Slack Ink Ribbon
If the printer reset does not release the cartridge, the colored ink ribbon may be slack inside the cartridge bay, catching on the plastic guides.
- Open the cartridge door on the side of the printer.
- Look inside the cartridge. You will see a small, green or yellow gear wheel built into the cartridge face.
- Use your thumb or a flat tool to rotate this gear wheel in the direction of the printed arrow (clockwise).
- As you turn the gear, it winds the ink ribbon back onto its spool inside the cartridge, tightening it.
- Once the ribbon is taut, press the release clip and pull the cartridge out.
Step 3: Battery and Power Verification
Never start printing when the status LED is flashing red (indicating low battery). If the battery dies mid-print, the fuser element will cool down while pressed against the photo paper, fusing the sheet to the printhead.
- If your printer died mid-print, connect it to a **5V / 2.1A wall charger** (do not charge via a laptop USB port).
- Let it charge for **20 minutes** to build sufficient voltage.
- Turn the printer on while connected to power. The printer should automatically finish ejecting the stuck sheet and release the cartridge lock.
How to Prevent Cartridge Jams
Keep these best practices in mind to keep your Kodak Mini Retro running smoothly:
- **Store cartridges in a cool place:** Excessive heat can melt the thin color spools together inside the cartridge case.
- **Handle cartridges by the edges:** Touching the internal film ribbon with your fingers transfers skin oils, which can cause the fuser to burn and tear the ribbon during printing.
- **Leave space:** Always leave at least 5 inches of free space at the back of the printer so the photo paper can slide out during color passes.
Related Kodak Troubleshooting Guides
Why 4PASS Cartridges Get Stuck in the Kodak Mini 2 Retro
The Kodak Mini 2 Retro utilizes an all-in-one cartridge containing both photo paper and an ultra-thin 4-color dye ribbon. The cartridge is held in place by an internal mechanical catch lever and driven by a multi-gear stepper motor.
If the printer loses battery power mid-print, suffers a paper jam, or overheats, the thermal printhead remains locked down against the dye film, mechanically trapping the cartridge inside the bay.
Step-by-Step Manual Cartridge Release Protocol
- Never Force or Pry the Cartridge with Screwdrivers:
Prying with metal tools will snap the plastic guide rails or crack the delicate thermal printhead glass. The cartridge can be released safely using the methods below.
- The Power-Cycle Head Release:
- Connect the Mini 2 Retro to a certified 5V/2A wall charger.
- Turn on the printer. The startup initialization will command the stepper motor to cycle, raising the thermal printhead to its home resting position.
- Once the power LED turns solid, open the side door and pull the cartridge out smoothly using its finger grip.
- The Gear Slack Reset (Manual De-tensioning):
If the ribbon film melted onto a photo sheet during an overheating event, the film is acting like tape holding the cartridge inside. Look inside the exit slot with a flashlight.
If paper is visible, use tweezers to gently peel the paper away from the ribbon. Turn the exposed white drive cog on the cartridge clockwise with your fingertip to take up ribbon slack, then pull the cartridge free.
- Hardware Pin-Hole Reset:
Press the pin-hole reset switch next to the Micro-USB/USB-C charging port with a paperclip for 5 seconds to force the firmware to reset motor registers.
Frequently Asked Questions
Can I reuse a cartridge if the ribbon torn while stuck?
Yes. If the ribbon tore cleanly, splice the two ends together using a small piece of clear Scotch tape, rotate the take-up spool gear clockwise until the taped joint is wound securely onto the internal spool, and reinsert.
How many photos are included in each Kodak Mini 2 cartridge?
Standard Kodak Mini 2 cartridges come in 20-print, 30-print, or 50-print packs (with 10 photo sheets loaded per individual cartridge module).
