


The Quick Answer
Learn how to safely clean your Munbyn printhead using isopropyl alcohol, and avoid the critical drying mistake that can permanently damage the printer.
Every faded label, and a good share of the streaky ones, traces back to the same few square inches of hardware: the printhead.
Learning how to clean a Munbyn printer head is the single highest-value maintenance skill for these machines — five minutes of work that restores print quality, extends the head's life by years, and costs you one cotton swab and a splash of rubbing alcohol.
It's also a job with exactly two ways to go wrong, and one of them can crack a printhead in a heartbeat. I've seen it happen on my own bench — once, early in my career, and never again.
This tutorial covers the right way, the two wrong ways, and the drying rule that separates them.
Quick Summary
- Power off and unplug. Let the head cool if you just printed.
- Open the lid, remove the label roll.
- Wipe the printhead — the strip the paper runs under — gently, end to end, with a swab and 70%+ isopropyl alcohol.
- Wipe the platen roller (the rubber bar below) while you're in there.
- Wait a full 3–5 minutes for the alcohol to evaporate — this step is non-negotiable, and I'll explain the scary reason why.
- Reload, calibrate if needed, print a test.
What You Need (and What You Must Never Use)
Use: cotton swabs or a lint-free cloth, and isopropyl alcohol, 70% or higher (90%+ is even better — it evaporates faster and leaves less water behind). A purpose-made thermal printer cleaning pen works too.
Never use: water, glass cleaner, or household sprays (they leave residue and minerals); anything abrasive — no paper towels with grit, no scouring pads; and absolutely no metal or fingernails against the head surface. Not to scrape a stubborn spot, not for a second.
Why the hard rules: the printhead's working surface is a row of microscopic heating elements sealed under a thin glass-like protective coating. Scratch that coating with anything hard and you create a permanent white line through every future label — a wound no cleaning ever heals.
The head produces images measured in fractions of a millimeter; treat its surface with matching respect.
Step-by-Step: The Clean Itself
Step 1 — Power off, unplug, and cool. If you've been printing, give the head five minutes to reach room temperature. A hot head flash-evaporates your alcohol before it can dissolve anything, and there's a bigger reason cooling matters that we'll hit in the drying section.
Step 2 — Open up and clear out. Lift the lid fully and remove the roll so you have a clear view of the paper path.
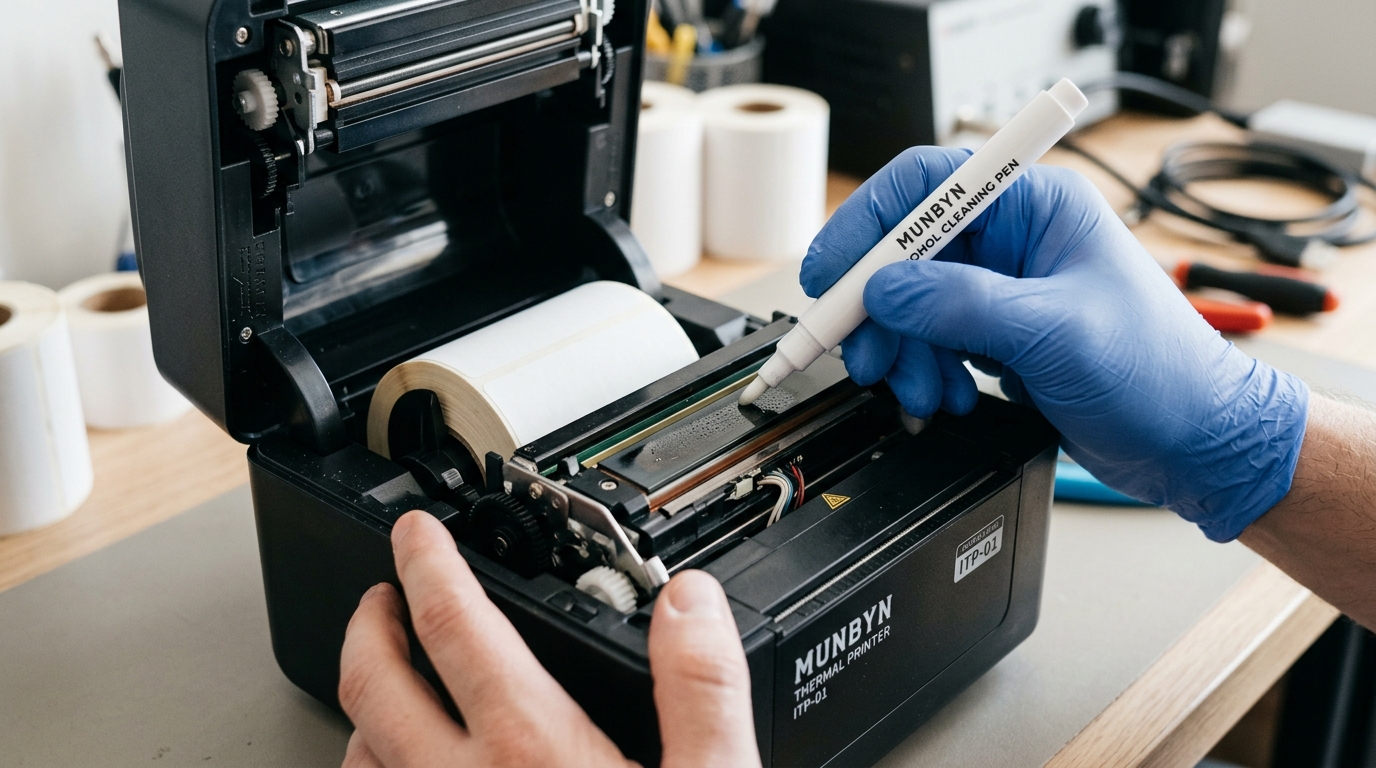
Step 3 — Find the printhead. It's the strip mounted on the underside of the lid mechanism (or the upper assembly), positioned so paper passes directly beneath it — usually a thin dark line of a surface. That line is where all the printing happens.
Step 4 — Wipe with the grain.
Dampen your swab — damp, not dripping — and wipe gently along the head, end to end, in one direction. Lift, re-wet if needed, wipe again.
You may see brown or gray residue on the swab: that's the enemy, a film of cooked adhesive and paper dust. Keep going with fresh swab faces until one comes away clean.
Step 5 — The roller too. While you're in there, wipe the rubber platen roller below the head, rotating it slowly with a finger to reach the full circumference. A grippy roller feeds straight; a sticky one causes stalls and drift, and it's sitting right there anyway.
Why one direction, why gentle: you're dissolving a film, not sanding a deck. Scrubbing back and forth grinds any grit you've picked up across the coating, and pressure adds nothing that the alcohol isn't already doing. Let the chemistry work.
The Drying Rule That Saves Printheads (My Uncommon Tip)
Here's the part most guides compress into two careless words — "let dry" — and it deserves a section, because this is the mistake that kills heads.
After cleaning, wait a genuine 3 to 5 minutes before powering on, longer in a humid room. The reason isn't neatness.
It's physics: the moment the printer runs a job, those heating elements spike from room temperature to printing temperature nearly instantly. If liquid alcohol is still sitting on the head, that spike flash-boils it against the protective coating — and the violent, uneven temperature change can stress or crack the coating.
The industry term is thermal shock, and it converts a five-minute cleaning into a dead printhead in the first second of the next print.
I learned this the expensive way as a young tech: cleaned a head, customer was in a hurry, ran a test print maybe forty seconds later. Faint tick, and a fresh white line through every label after.
The head was fine before I "maintained" it. Fifteen years later, I still set a timer after every head cleaning, and I'm telling you to do the same — phone timer, five minutes, walk away.
Same logic applies in reverse, which is why Step 1 says let a hot head cool before wetting it: never introduce liquid to hot glass, in printers or in kitchens.
Why this works: evaporation is complete or it isn't, and you can't see the difference — a head that looks dry can still hold alcohol in the microscopic gaps that matter. Time is the only reliable test, and five minutes is cheap insurance on the most expensive component in the machine.
How Often, and How to Know It's Working
Under regular use, clean every two to three rolls of labels — or monthly for daily shippers, and immediately whenever print starts fading or streaking. Keep a sleeve of swabs in the same drawer as your label stock so the habit has no friction.
To verify your work: print a self-test page (hold FEED while powering on) before and after cleaning. A successful clean visibly darkens and evens out the test pattern.
If pale bands or thin white lines survive a thorough cleaning in the same positions, those are worn or dead heating elements — a hardware condition, not a hygiene one.
When to Call a Professional
Persistent white lines through the self-test after proper cleaning mean physical element failure, and no swab resurrects a dead element. Email Munbyn support with before/after self-test pages; under warranty this typically ends in replacement.
Out of warranty, ask whether a replacement printhead exists for your model and price it against a new unit — and try one thing first: drop the print speed one notch and adjust density, because a slower pass can keep a tired head producing usable black for a surprisingly long retirement. Honest repair advice sometimes means recommending a settings change over a sale, and this is one of those times.
FAQ
What should I use to clean a Munbyn printer head?
Cotton swabs or lint-free cloth with isopropyl alcohol, 70% or higher. Never water, household cleaners, or anything abrasive — and never touch the head with metal or fingernails.
How long should I wait after cleaning before printing?
A full 3–5 minutes, longer in humidity. Printing on a still-damp head risks thermal shock that can crack the head's protective coating — the one cleaning mistake with permanent consequences.
How often does a Munbyn printhead need cleaning?
Every two to three label rolls, monthly for heavy use, and immediately at the first sign of fading or streaks. Regular cleaning is the cheapest printhead life-extension there is.
I cleaned the head but white lines remain. Did I do it wrong?
If the lines sit in the same spots on every self-test, those are dead heating elements — wear, not dirt. Cleaning can't fix them; that's a warranty or replacement conversation.
That's how to clean a Munbyn printer head the way it's done on a professional bench: cool, unplugged, gentle alcohol passes with the grain, the roller while you're in there — and then the timer. Five patient minutes of drying is the whole difference between maintenance and damage.
Build the habit every few rolls, and faded labels become something that happens to other people's printers.
