


The Quick Answer
The self-test page is your printer's diagnosis of itself. Learn how to print it, read the DPI, and interpret the test pattern.
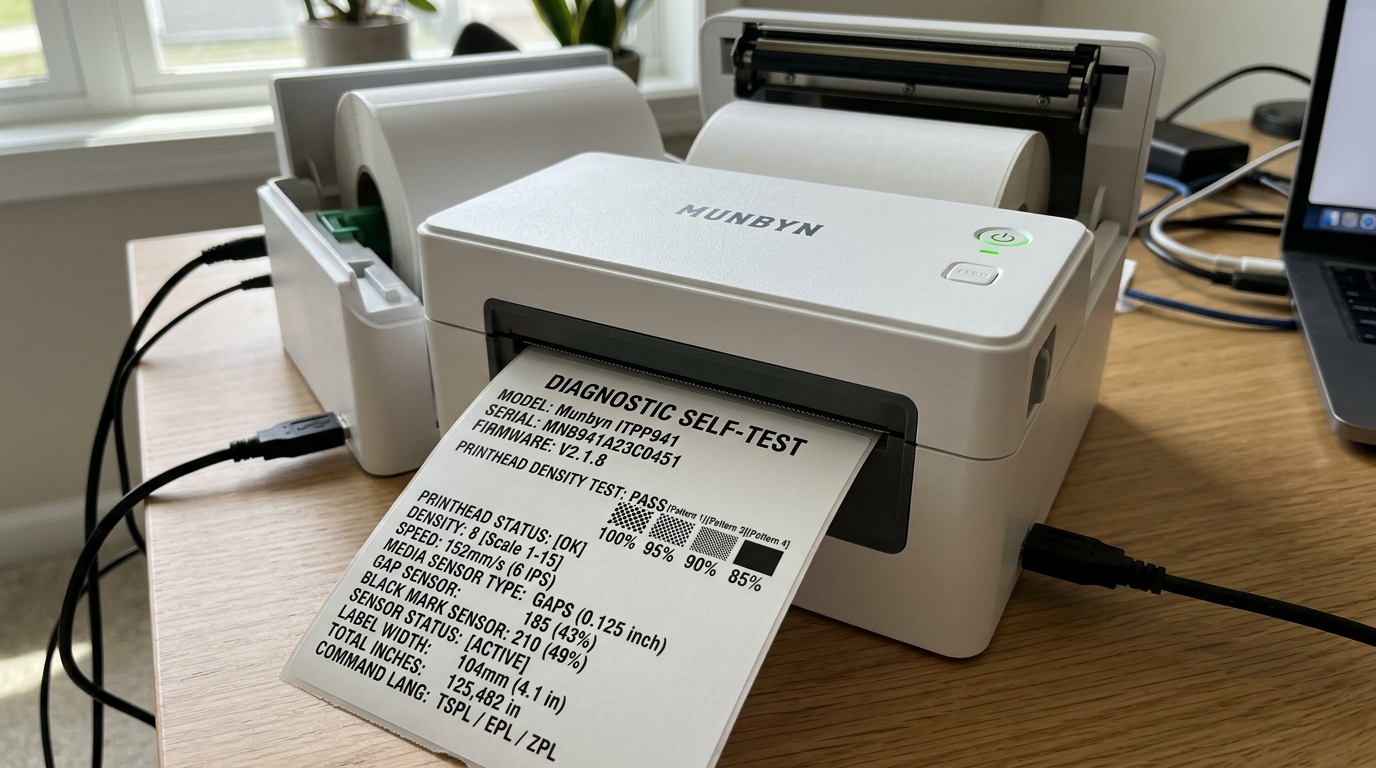
If a Munbyn printer could hand you a doctor's report, this would be it. The Munbyn printer self test page is a one-page printout generated entirely by the printer itself — no computer, no driver, no app anywhere in the chain — and it answers, in about ten seconds, the question every troubleshooting session begins with:
is the problem the printer, or everything attached to it?
Most owners print one only when a support agent asks. That's backwards.
Learn to print it and — the part almost nobody teaches — learn to read it, and you've got the most powerful free diagnostic these machines offer. Here's both halves, from a bench where self-test pages get printed before coffee.
Quick Summary
- Desktop models (ITPP941 family, ITPP130): power off, then hold the FEED button while switching the printer on; release when it starts printing.
- Portable models (ITP01 and similar): with paper loaded, typically a double-press of the power button — check your model's quick-start card if that doesn't fire.
- What you get: firmware version, resolution (DPI), density, speed, stored label size, and a printhead test pattern.
- What it proves: a clean self-test means healthy hardware; the fault lives upstream in your computer, driver, or app.
How to Print It
Desktop models: switch the printer off. Press and hold the FEED button, and while holding it, flip the power on. Keep holding until the printer begins feeding and printing — then release. Out comes the self-test.
Portable models: load a few labels, power the printer on, and press the power button twice in quick succession. Models vary here more than desktops do; if the double-press doesn't fire on yours, the quick-start card or the Munbyn app's printer settings will name the trigger.
Why the awkward button dance: the self-test must be impossible to trigger by accident (nobody wants surprise diagnostic pages mid-shipping-rush) but possible with zero working software — because its whole job is to function when everything else doesn't. A printer that can't even complete a self-test has told you something important too, and we'll get to that.
Reading the Page: The Settings Block
The top portion is text — the printer's sworn statement of its own configuration. The exact layout varies by model, but look for these lines and what each one settles:
Firmware/version: which internal software the printer runs. Hold that thought — it's my uncommon tip below.
Resolution (DPI): 203 or 300. This line settles the wrong-driver question permanently: your installed driver must match this number exactly. Mismatched DPI causes subtly mis-sized labels and coin-flip barcode scanning, and this line is the ground truth.
Density/darkness and speed: the printer's current heat and pace settings. Before any factory reset, this block is your backup — reset, then restore these exact values instead of guessing.
Label size: the stored measurement from your last calibration. If this number doesn't match a ruler held against your actual labels, you've found your skipping/misalignment culprit without opening a single menu.
Why the text block matters: every line converts an argument into a fact. "I think I have the 300 DPI model" becomes a printed number.
"Density seems normal" becomes a value you can compare and restore. Diagnosis is mostly the elimination of guessing, and this block eliminates five guesses per page.
Reading the Page: The Test Pattern
Below the text sits the pattern — typically dense rows, gradients, or full-width blocks designed to fire every heating element on the printhead at once. This is the physical exam, and here's how to grade it:
Uniform, solid black everywhere: healthy head. Whatever your problem is, it isn't hardware.
Evenly light all over: the head fires but weakly — usually a dirty printhead (clean it with isopropyl alcohol) or conservative density/speed settings, both fixable.
Thin white vertical lines or pale bands in fixed positions: dead or dying heating elements. This is physical wear — no cleaning, setting, or reset revives a dead element — and those lines will cut through every barcode you print at exactly those positions. This finding is a warranty conversation.
Why the pattern is the verdict: it exercises the full width of the head under the printer's own control, so any defect you see is real, physical, and located. A photo of this pattern tells a support tech more than three paragraphs of description — which is why they always ask for it.
The Firmware Line Nobody Reads (My Uncommon Tip)
Here's the habit that separates owners from technicians: actually look at the firmware version line.
Printer firmware is the machine's internal software, and like all software it ships with bugs that later versions fix — calibration quirks, connection instability, sizing oddities. Manufacturers, Munbyn included, periodically release updated firmware or utility tools, usually installed via a computer over USB.
Yet in fifteen years I can count on one hand the customers who knew their printer had a firmware version, let alone which one.
The move: when a stubborn problem survives all the standard fixes — especially a weird, intermittent one — note your firmware version from the self-test page and email Munbyn support asking one precise question:
"I'm on firmware X.XX; is there a newer version that addresses [my symptom]?" Sometimes the answer is a download link that ends a saga no amount of cleaning and calibrating could touch.
Why this works: intermittent gremlins that laugh at hardware fixes are often software gremlins living below every setting you can reach — and the firmware line is the only visible evidence of that layer's existence. Asking support with your version number in hand also skips two rounds of back-and-forth, because it's the first thing they'd request anyway.
One line of text, read once, and you're troubleshooting a whole layer deeper than most owners know exists.
The Split Test: How Pros Use This Page
The self-test's greatest power is one clean cut through any mystery. Printer misbehaving? Print the self-test and apply the rule:
Self-test prints perfectly → the printer is innocent. Your fault lives upstream: driver, duplicate printer entries, app permissions, cable, paper size settings. Stop poking the hardware.
Self-test fails or prints damaged → the printer is the suspect. Now hardware fixes (cleaning, calibration, reset) and support conversations are the right road, and you can skip every computer-side rabbit hole.
Why this works: troubleshooting dies in the swamp of "it could be anything." One page drains half the swamp instantly. It's the first thing I do with every machine on my bench, and it should be the first thing you do at your desk.
When to Call a Professional
Two self-test outcomes go straight to Munbyn support: a pattern with fixed white lines or bands (element failure — attach the page, or a clear photo of it, to your ticket;
under warranty this typically ends in replacement), and a printer that cannot produce a self-test at all despite good power and loaded, verified-thermal labels — a machine that fails its own internal routine has a board, motor, or power fault beyond home repair.
In both cases, include the firmware version and DPI from a previous self-test if you have one; it's exactly the evidence that shortens tickets.
FAQ
How do I print a Munbyn printer self test page?
Desktop models: hold the FEED button while powering the printer on, release when printing starts. Portables: usually a double-press of the power button with labels loaded — check your quick-start card if not.
What does the self-test page tell me?
Firmware version, true DPI, current density and speed, the stored label size, and a printhead test pattern that reveals dead elements. It's the printer's full self-diagnosis, produced with no computer involved.
My self-test prints fine but regular printing fails. What does that mean?
That's the split test working: your hardware is healthy, so the problem is upstream — driver, app, cable, settings, or duplicate printer entries on your computer.
White lines run through my self-test pattern. Can I fix that?
Not with cleaning or settings — fixed white lines are dead heating elements, physical wear. That's a warranty claim or, out of warranty, a replacement-versus-repair math problem.
The Munbyn printer self test page is ten seconds of button-holding that replaces an hour of guessing: it names your DPI, records your settings, grades your printhead, and — if you read the line everyone skips — reveals the firmware layer where the strangest bugs hide. Print one today while everything works, file it in a drawer, and every future problem starts with evidence instead of anxiety.
