


The Quick Answer
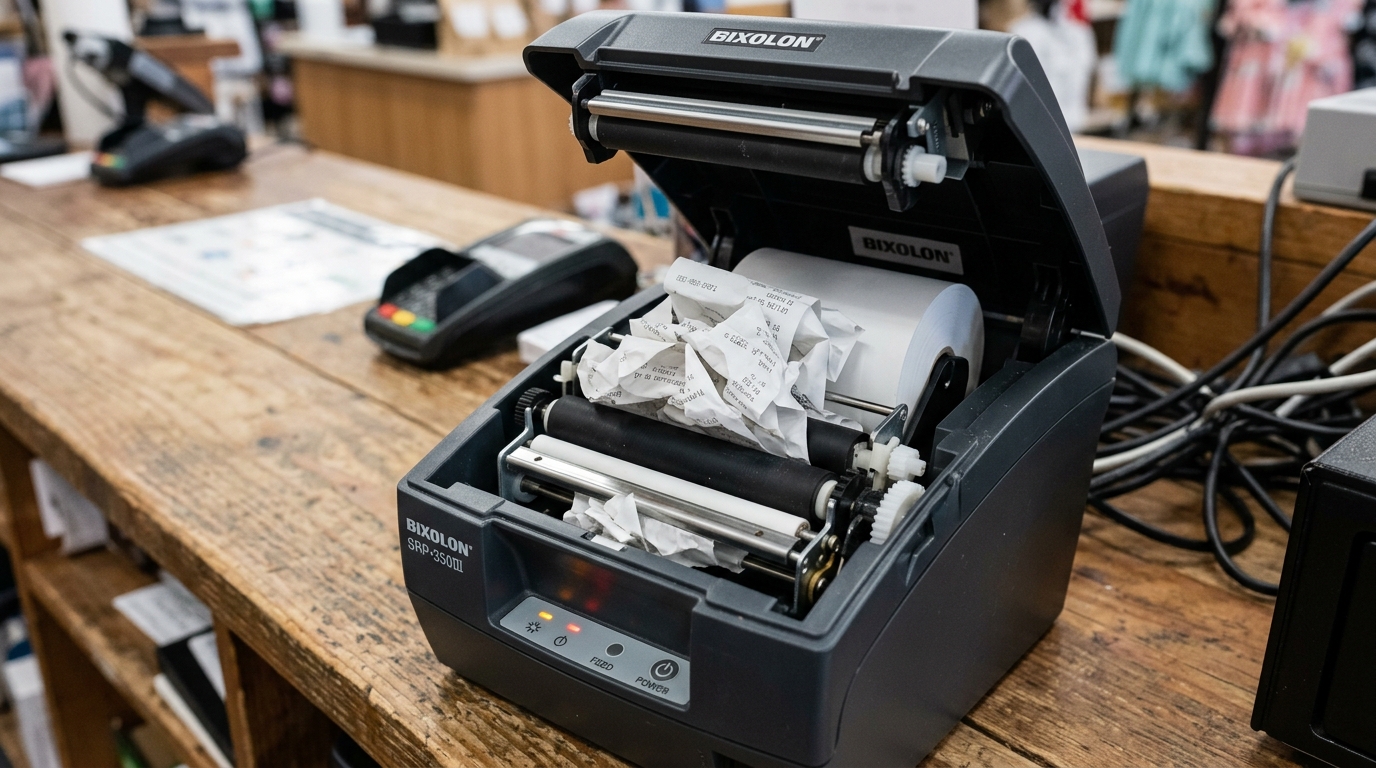
Is paper stuck inside your Bixolon receipt or label printer? Avoid permanent print head damage by following this safe step-by-step clearance guide.
A paper jam on a Bixolon printer isn't usually the crisis it feels like — most jams clear in under three minutes if you approach them the right way.
What causes damage isn't the jam itself; it's people forcing paper out in the wrong direction, cutting through it with sharp tools, or reaching into the cutter mechanism while power is still on.
Here's the correct, safe procedure — including for cutter jams, which have a specific fix that differs from a paper-path jam.
Before You Touch Anything: Power Off
Turn off the printer completely before opening the cover. This is non-negotiable for two reasons:
- Safety — the auto-cutter blade and print mechanism have moving parts that can cause injury if triggered while your hands are inside.
- Print head protection — pulling paper against the head while it's actively hot can damage or contaminate the head surface.
The bulk of "printer got worse after I cleared the jam" stories start with someone trying to clear paper while the printer was still on.
Step 1: Open the Cover Fully
Push the cover release lever (usually at the front-top of the printer) and open the cover to its fullest position. Don't try to work through a partial opening — you can't see the paper path clearly and you're more likely to tear the paper further.
Step 2: Look Before You Pull
Take a moment to actually see where the jam is:
- At the paper roll itself — the roll may be jammed against its holder or unwinding unevenly
- At the print head area — paper crumpled or bunched under the head
- At the cutter (for models with auto-cutters) — paper stuck in the blade mechanism
- At the paper outlet — a partial receipt caught on the way out
Where the jam is determines the direction you pull.
Step 3: Pull Paper in the Direction It Was Feeding
This is the single most important rule for paper jams: pull the paper in the same direction it was going. Pulling backward — trying to feed jammed paper back onto the roll — is the most common cause of print head damage during jam clearance.
- Grasp the loose end of the paper (typically visible at the outlet or above the print head)
- Pull steadily and gently in the direction of normal paper feed (out through the outlet)
- If the paper tears, that's fine — just don't leave fragments behind
Step 4: Remove Every Fragment
Small torn pieces are a bigger problem than they look. A fragment stuck to the roller or covering a sensor causes:
- Repeated "paper out" errors even when a new roll is loaded
- Feed motor stalls
- Sensor misreads causing constant recalibration attempts
Use a flashlight if needed to check for small pieces along the entire paper path — roll cradle, feed rollers, print head area, cutter mechanism, and paper outlet. Remove anything you find with your fingers or tweezers, never with a sharp tool.
Step 5: Check for Adhesive Residue (Label Printers Especially)
On label printer models like the XD3-40 and XD5-40, a "paper jam" is often actually adhesive buildup on the roller — the sticky residue prevents the roller from feeding cleanly. Wipe the roller with a lint-free cloth dampened in isopropyl alcohol; never use abrasive cleaners or sharp tools.
Step 6: Reload Paper With a Clean Leading Edge
Once the path is clear:
- Cut the leading edge of your paper roll straight across with scissors — a clean, straight edge feeds much more reliably than a torn or angled one
- Load the roll with the correct orientation (thermal-side facing the print head on receipt printers)
- Feed the leading edge through the paper path so about an inch protrudes past the print head
- Close the cover firmly, pressing at the center for even latch engagement
Step 7: Test With a Self-Test
Before sending real print jobs, hold the Feed button while powering on to trigger a self-test. This confirms:
- Paper feeds through the mechanism cleanly
- No fragments remain in the path
- The print head is working correctly
- The cutter (if equipped) is not stuck
A clean self-test means you're done. If issues remain, the jam may not be fully cleared, or there's a secondary problem.
Cutter Jams (Different Procedure)
If the jam is specifically in the auto-cutter blade — not the paper path — the fix is different, because the cutter mechanism is sensitive to being forced:
- Power off the printer completely.
- Open the main cover.
- For models with a separate cutter cover (like the SRP-E300), open that as well.
- Use tweezers to gently trong> to gently remove any debris or paper caught in the blade — never your fingers directly near the blade, and never a screwdriver or knife.
- Do not attempt to move the cutter blade manually — this can misalign the mechanism.
- For a minor jam where the blade seems stuck but no visible debris is present, simply powering the printer off and back on can often allow the blade to auto-reset to its home position on its own.
- Close both covers, power on, and run a self-test to confirm.
If the cutter continues to jam after clearance, and there's no visible debris, contact Bixolon support — a mechanical fault in the cutter itself may need service.
Why Jams Keep Happening (Preventing the Next One)
If your Bixolon printer jams repeatedly, address the underlying cause rather than continuing to clear jams:
- Wrong paper type or dimensions. Using paper wider, narrower, thicker, or thinner than the model's specification causes recurring jams. Confirm your paper matches your model's rated spec.
- Old or damaged paper roll. Rolls that have been dropped, crushed, or stored in humid environments deform enough to jam. Try a fresh roll if jams start after storage changes.
- Adhesive residue accumulation. Especially on label printers, buildup on rollers and the media path progressively worsens until cleaning is required. Add roller cleaning to your regular maintenance schedule.
- Loose roll winding. A roll that unwinds unevenly can catch on the roll holder. Confirm the roll spins freely before closing the cover.
- Cover not latching evenly. Uneven pressure closing the cover causes uneven paper feed pressure. Press the cover at the center when closing.
- Media sensor dust. Paper dust builds up on media sensors, causing them to misread and stop paper feed mid-print. Clean sensors during routine maintenance.
When the Jam Won't Clear
Escalate to Bixolon support if:
- You've cleared visible paper but the printer still reports a jam
- Paper physically will not pass through the mechanism cleanly on a self-test
- The cutter is jammed and no debris is visible
- The printer makes unusual grinding or clicking sounds during paper feed
Frequently Asked Questions
Should I pull the jammed paper forward or backward? Forward, in the direction of normal feed. Pulling backward can damage the print head as the paper drags against it.
Can I use a screwdriver or knife to clear a stuck cutter? No. Only tweezers, and only with the printer powered off. Sharp tools can damage the blade mechanism or the sensor near it.
Why does my Bixolon printer keep jamming with the same brand of paper that used to work fine? Either the paper roll batch has changed slightly in thickness or coating, the paper has aged/absorbed moisture, or your rollers have accumulated adhesive residue reducing their grip.
Try a fresh roll from a different batch, and clean the rollers.
Is it safe to run the printer after a jam has been cleared? Yes, once you've confirmed no fragments remain and a self-test completes cleanly. That confirms the mechanism is working normally again.
Quick Checklist
- Printer powered off before opening any covers
- Cover opened fully to inspect the paper path
- Paper pulled in the direction of normal feed, never backward
- All fragments and small pieces removed from the path
- Rollers wiped for adhesive residue (especially label printers)
- Paper cut with a clean, straight leading edge before reloading
- Cover closed with even pressure at center for full latch engagement
- Self-test run to confirm clean operation before real print jobs
Most paper jams on Bixolon printers are quick fixes if you follow the right sequence: power off, open, look, pull forward, remove fragments, reload cleanly.
The most damage comes from rushing — take the extra 30 seconds to do it right, and you avoid turning a two-minute problem into a print-head replacement.
